How to Crochet a Buffalo Plaid Pixie Bonnet
I’m really happy to share an adorable new pattern with you today…a buffalo plaid bonnet! I had my hands full this past winter with the birth of our baby girl so designing and writing were on a brief hold. But since it was ready, I decided to publish my winter patterns in the spring anyway. I think the Buffalo Bonnet will be perfect for keeping those little ears warm whether you make it now or you decide to wait until fall rolls back around.

The following is a free pattern available for use on my website, if you would like to purchase a detailed, ad-free PDF version of this pattern, please visit my Etsy or Ravelry shop. All rights reserved. (Note: Pattern published in March 2019 and updated in October 2020. Please email me for updated PDF if purchased prior to October 2020.)
**This site contains affiliate links to products. I may receive a commission for purchases made through these links. This is a great way to support my small business AND get the supplies you need for your project!**
The Inspiration
One of the very first color work projects that I ever crocheted was the Plaid Slouchy Hat by Bethany at Whistle and Ivy. At the time, creating buffalo plaid print with yarn was a brand new concept. I won’t say that my first color work project was great, but I was definitely hooked. Since then Bethany has come out with a whole bunch of amazing plaid patterns; she even has a Plaid Course! So if you’re looking for more buffalo plaid patterns, definitely head over to Whistle and Ivy.
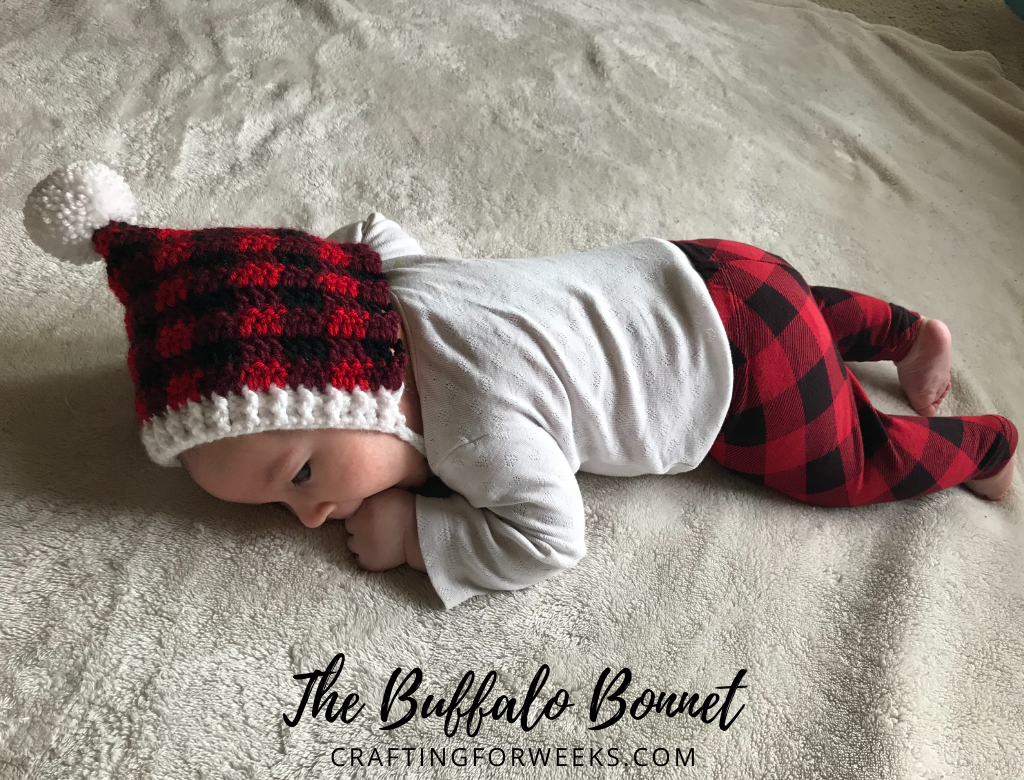
After some practice with color work, I decided I wanted to use the print in a design of my own. Baby girl had a pair of adorable little plaid leggings that I wanted to match. My little ones have never been big fans of fitted hats, but they don’t seem to mind bonnets. So I got to work creating the Buffalo Bonnet!
About the Buffalo Bonnet
The Buffalo Bonnet is a buffalo plaid bonnet created in the classic pixie bonnet style. This little beauty is so easy to do because you’re basically just making a fancy rectangle! The pattern is written in sizes Newborn all the way up to Age 10. So you can make it for a new baby or to keep your little muchkin’s ears warm while they’re playing outside.
Due to the nature of buffalo plaid, there’s a little bit of color work involved in this pattern. but even if you’re a beginner, I think you’ll be able to work this buffalo plaid bonnet up just fine. If you’re brand new to color work, you can check out my full tutorial here. I wrote up some tips and techniques for crocheting this bonnet. You’ll find a photo tutorial for carrying yarn, changing colors, and a few other things.
About the Yarn
This buffalo plaid bonnet pattern calls for worsted weight yarn. My original hat for baby girl was done with I Love This Yarn from Hobby Lobby. For the larger size that I made her this season, I used a mix of ILTY and Brava Worsted from WeCrochet. I find these two to be somewhat similar in weight and feel, so if you don’t have access to Hobby Lobby or just prefer not to shop there, check out WeCrochet!
I think you’ll be able to meet gauge with most worsted weight yarns. Plus the yardage needed for each color is fairly low, so this is a great project to use up some leftover yarn scraps!
Love it?! Pin it for Later!

Let’s Get Started…
What You’ll Need
70 – 180 yds of Worsted Weight yarn in 3+ colors
Size I (5.5mm) crochet hook
Size H (5mm) crochet hook
Tapestry needle
Scissors
Small Pom Maker (optional)
Stitches Used
Ch – Chain
DC – Double Crochet
FPDC – Front Post Double Crochet
BPDC – Back Post Double Crochet
Mattress Stitch
Skill Level
Advanced Beginner
Gauge
15 stitches DC x 8 rows = 4” square
Notes
- Buffalo plaid pattern can be done in a variety of colors. To accomplish this, Color A should be a shade of Color C (ex: burgundy and red, light pink and dark pink), while Color B will be your neutral color (ex: black, white). The Brim color can be the same or a contrasting color to the rest of your work.
- Parentheses are used to differentiate between sizes throughout the pattern. Sizes are as follows Newborn (0-3 Months, 3-6 Months, 6-9 Months, 9-12 Months, 1-2 Years, 2-5 Years, 5-10 Years).
- For a softer fabric, I recommend carrying Color A throughout the body of hat and cutting Colors B and C at the ends of each of their respective rows. To reduce the number of ends to weave in, you may also carry all three colors throughout the entire bonnet. This may result in a slightly stiffer fabric.
- Chains at beginning of the row count as a stitch through this pattern in the brim of this pattern only. They will not count throughout the body of the bonnet.
- Rows 2 and 3 will vary based on the size you are making, so be sure to pay attention to which directions you use.
Pattern
NB (0-3 Mo, 3-6 Mo, 6-9 Mo, 9-12 Mo, 1-2 Yrs, 2-5 Yrs, 5-10 Yrs)
BRIM
With I (5.5mm hook), Ch 44 (47,50,53,56,59,62,65).
Row 1: DC in 4th chain from hook (Note: Ch spaces count as first stitch throughout Brim Section). DC in next chain and each chain across. (42,45,48,51,54,57,60,63)
Row 2: Ch 3 and turn. FPDC in next stitch, BPDC in next stitch. Continue from * until you reach the turning chain. DC 1 in turning chain. (42,45,48,51,54,57,60,63)
(For size 1-2 Years, 2-5 Years, and 5-10 Years)
Row 3: Ch 3 and turn. *FPDC in FPDC stitch from previous row. BPDC in BPDC in stitch from previous row. Continue from * until you reach the turning chain. DC 1 in turning chain.
HAT
Switch to H (5.0mm hook).
Row 1: Attach CA (Color A). Ch 2 and turn (Chains no longer count as a stitch). DC in first 3 stitches. *Switch to CB (Color B) DC in next 3 stitches. Switch to CA, DC in next 3 stitches*. Continue from * to * until you reach the end of the row. (42,45,48,51,54,57,60,63)
Row 2: (For sizes Newborn, 3-6 Months, 9-12 Months, 2-5 Years)
With CA, Ch 3 and turn. DC in first 3 stitches Switch to CC (Color C) DC in next 3 stitches. Switch to CA, DC in next 3 stitches. Continue from * until you reach the end of the row. (42,45,48,51,54,57,60,63)
Row 2: (For sizes 0-3 Months, 6-9 Months, 1-2 Years, 5-10 Years)
Attach Color C (CC), Ch 3 and turn. DC in first 3 stitches. Switch to CA, DC in next 3 stitches. Switch to CC, DC in next 3 stitches. Continue from * until you reach the end of the row. (42,45,48,51,54,57,60,63)
Row 3: (For sizes Newborn, 3-6 Months, 9-12 Months, 2-5 Years)
With CB, Ch 3 and turn. DC in first 3 stitches Switch to CA, DC in next 3 stitches. Switch to CB, DC in next 3 stitches. Continue from * until you reach the end of the row. (42,45,48,51,54,57,60,63)
Row 3: (For sizes 0-3 Months, 6-9 Months, 1-2 Years, 5-10 Years)
With CA, Ch 3 and turn. DC in first 3 stitches. Switch to CB, DC in next 3 stitches. Switch to CA, DC in next 3 stitches. Continue from * until you reach the end of the row. (42,45,48,51,54,57,60,63)
Repeat Rows 2-3 until you complete 9 (10,11,12,13,13,14,15) rows of plaid.
Assembly
For more photos and tips on assembly, check out the tutorial here.
- Fold the finished piece in half width-wise, so that the short ends are together, right side facing out.
- Mattress stitch the edge directly across from the brim closed.
- Optional Neckline Tapering: Attach yarn color of choice to the bottom edge in the stitch row right behind the brim. Slip stitch in first DC row. Sc 1 in each DC row around the bottom edge until you reach the last row before the brim. Slip stitch in last row. Tie off and weave ends.
- Cut 6 or more strands of Brim color yarn 18-24”. (More strands will result in thicker straps.)
- Thread at least 3 strands through the bottom corner of the brim and fold them in half. Braid the strands and knot the ends.
- Optional: Make a small pom using a pom-maker and attach it to the top corner of your hat.

Final Thoughts
I hope you enjoy this fun buffalo plaid bonnet! If you decide to make the Buffalo Bonnet, be sure to tag me in your photos on Instagram at @craftingforweeks. I love seeing your makes and I share them when I can.
If you had fun with this color work pattern, be sure to check out some of my other color work designs like the Luxe Leopard Beanie or the Houndstooth Slouch Hat.
Until next time…Happy Crafting!




What color did you use?
I used Red, Aubergine, and Black in I Love This Yarn from Hobby Lobby. Hope that helps!
Thanks so much for the shout out! Your bonnet is darling!