
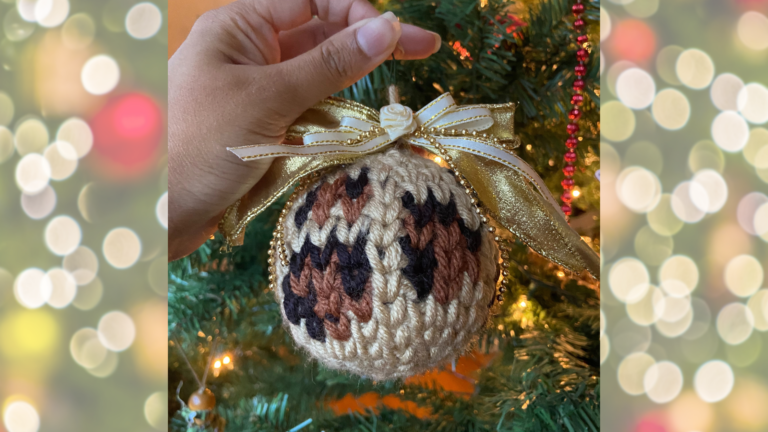
How to Crochet a Leopard Print Beanie
Today I’m excited to share one of my favorite beanie patterns…the Luxe Leopard Beanie in worsted weight! I designed this pattern in 2019 and it was one of my most popular patterns that year. While my little business wasn’t in a place to share the pattern for free back then, I’m happy to share it now. So if you love crochet accessories and leopard print, this crochet leopard beanie is perfect for you!
The following is a free pattern available in four sizes: Adult, Child, Toddler, and Baby. If you would like to purchase a PDF version of this pattern with a total of 10 sizes and 3 graphs to work from, please visit my Etsy or Ravelry shop.

**This site contains affiliate links to products. I may receive a commission for purchases made through these links. This is a great way to support my small business AND get the supplies you need for your project!**
About the Beanie
I designed this beanie a few months after I made the original pattern The Luxe Leopard Beanie – Bulky. The bulky beanie was my first crochet leopard beanie. I love the bulky version because I think its the perfect balance between a complex and a quick project. The spots are intentionally large to account for the bulky yarn. But you still get the visual effect of the leopard spots and it works up fast enough to include in a market.
Once I started to get a lot of comments about yarn availability issues and questions about substituting worsted weight, I decided to just rework the pattern with new stitch counts. One fun thing I discovered about reworking it in worsted weight, was that you could get away with a smaller spot pattern. So as bonus, I included a second chart with my pattern that I dubbed “Petite” print. While I love them both, our mild winter weather definitely has me reaching for the worsted weight version much more often.
Also be sure to check out the Love Leopard Beanie. This Valentines Day modification that I did to the graph to add hearts to the print. It is available for free in four sizes here!

About the Yarn
So I designed this beanie with Lion Brand Basic Stitch. This was a fairly new yarn option when I was making my hat, so I wanted to give it a go. I think the Basic Stitch yarn works great, but I still consider Lion Brand Heartland my go-to for worsted weight yarn. (They also didn’t have the colors I needed at Jo-ann Fabrics that day in Heartland, so I’m sure that influenced my yarn choice.)
I think another great option for worsted weight is the Brava Worsted Weight from WeCrochet. I used this yarn for my Luxe Leopard Pumpkins. One of the reasons I like this yarn is that there are a lot of color options. Its also a great choice if you’re shopping for affordable yarns. Ultimately though, most worsted weight yarn with work for this project. Just be sure to check your gauge.
Special Techniques
Like the other items in the Luxe Leopard Collection, there are a few special techniques that you should be familiar with before starting.
Waistcoat Stitch
This beanie uses waistcoat stitch. Waistcoat stitch is essentially just a variation of single crochet. The only difference is that you will be working between the posts of the stitch below. This creates a knit-look texture.
Waistcoat stitch can prove to be a bit tricky for some people. It’s important to keep your tension much looser than you normally would so that you can actually get your hook between those posts. Sometimes you might find that you need to go up a hook size to make it work. Make & Do Crew has a good video tutorial on this stitch. Find it here!
And if you decide that you just don’t want to use waistcoat stitch, you can try substituting single crochet in the back loop only (BLO). Using this variation of single crochet will help to keep the colorwork pattern from slanting as you go.
Reading a Graph
This crochet leopard beanie uses a chart to direct color changes. To read the chart, you will begin in Row 1, Column 1 in the bottom, right corner. White boxes will represent your main color and black boxes will represent your contrasting color. The gray are optional but would represent your second contrasting color.
You will complete one stitch in the corresponding color per box. In the stitch before a color change, you will need to follow the instructions for ‘Changing Colors’. When you reach the end of your row, you will return to Column 1 and begin working the next row. (Note: If you are left-handed and working counter-clockwise, make note of the Column corresponding to number of stitches across on the chart for the size you are working. Start on the bottom left corner of the chart at the marked Column and work across, returning to the left side at the end of each row.)
Tapestry Crochet
There are a few different ways to do colorwork in crochet. When I make this hat, I use tapestry crochet and carry both colors of yarn along with me. I carry the yarn behind the stitches and wrap the color I’m using around the carried yarn.
To do this, you will loosely hold the unused yarn behind the stitches. Insert your hook into the stitch making sure it goes under the yarn you’re carrying as well as the stitch itself. Complete your stitch. This will wrap your working stitches around the carried yarn. You can carry the yarn the unused yarn until you need to change colors. Just bear in mind, that the number of strands that you carry can effect the stiffness of your finished project.
Bethany from Whistle & Ivy has a great tutorial video on tapestry crochet and reading a graph if you need more help. Check it out here.
Love it? Pin it for later!

Let’s Get Started…
Materials Needed
- 2 Skeins of Lion Brand Basic Stitch (or comparable worsted weight yarn)
- 50-175 yds of main color
- 20-85 yds of contrasting color
- Size H (5.0mm) hook
- Size J (6.0mm) hook
- Optional: Size K (6.5mm) hook
- Tapestry needle
- Pom Maker or Faux fur pom (optional)
Stitches Used
Sl St – Slip Stitch
Ch – Chain
SC – Single Crochet
SC2Tog – Single Crochet two together
Gauge
With J Hook, working in the round using waistcoat stitch.
12 SC stitches x 16 rows = 4” square
Skill Level
Intermediate
Finished Measurements
Baby: Width 8”, Height 6.5”
Toddler: Width 9”, Height 7.5”
Child: Width 9.5”, Height 8.5”
Teen/Adult: Width 11”, Height 10”
Notes
- This hat is worked in a continuous round. You may want to mark the first stitch of each round with a stitch marker.
- The Decreasing Rounds vary by size. Be sure to pay attention to which row you should begin the decreasing rounds with.
- Sizes are written (Baby, Toddler, Child, Teen/Adult)
- You can make this beanie with three colors by adding an accent color to the center of the spots.
Pattern
(Baby, Toddler, Child, Teen/Adult)
Brim
Using H hook & Main Color.
Row 1: Ch (9,11,11,13). Sc in 2nd chain from hook and in each chain across. (8,10,10,12)
Row 2: Ch 1 and turn. Sc in BLO of first stitch and each stitch across. (8,10,10,12)
Repeat Row 2 until band has a total of (50,58,62,70) rows.
Holding ends together, sl st in each stitch across both pieces to close band. Do not break yarn. Turn band so slip stitches are facing inward and working yarn is on top.
Hat
Using J hook.
Foundation Round: Ch 1. Using loose tension, Sc 1 in each brim row around the top edge of the brim. (50,58,62,70)
Round 1: Using Waistcoat stitch, SC in each st around following color changes according to corresponding graph.
Baby Graph

Toddler, Child, Adult Graph

Repeat Round 1 until hat measures (5.5”, 6”, 7”, 8”), including brim. Move on to Decreasing Rows.
Decreasing Rounds
Using Main color and continuing in Waistcoat stitch.
Teen/Adult Size start decreasing with Round 1
Round 1: *Sc 4, Sc2Tog*. Repeat from * around. Sc in any remaining stitches.
Round 2: Sc in each stitch around. Move on to Round 3.
Toddler & Child Size start decreasing with Round 3
Round 3: *Sc 3, Sc2Tog*. Repeat from * around. Sc in any remaining stitches.
Round 4: Sc in each stitch around. Move on to Round 5.
Baby Size start decreasing with Round 5
Round 5: *Sc 2, Sc2Tog*. Repeat from * around. Sc in any remaining stitches.
Round 6: Sc in each stitch around.
Round 7: *Sc, Sc2Tog*. Repeat from * around. Sc in any remaining stitches.
Round 8: Sc in each stitch around.
Round 9: Sc2Tog around. Tie off leaving long tail.
Assembly
- Using a tapestry needle, weave the long tail in and out of the top row of stitches approx. every 2-3 stitches.
- When you have gone all the way around the top of the hat, pull the tail tight, cinching the top of the hat closed.
- Turn hat inside out, then tie off and weave the ends.
- Optional: Attach Faux fur or yarn pom to top of hat.
Final Thoughts
I hope you love the Luxe Leopard Beanie in worsted weight as much as you loved the bulky. I’m so excited that I could share this crochet leopard beanie with you now, even if it is almost a year old. I’ll be sharing some more leopard print patterns with you this fall, so be on the lookout!
And if you’re looking to switch things up from a crochet leopard beanie to more of a textured look, check out some of these free patterns.
Until next time, Happy Crafting!


OMG! I just came across your leopard print hat and I’m in love! I have 3 little great nieces that this will look adorable on. I can’t wait to make it! Love your other patterns too! Thank you for great patterns and great instructions and pattern notes on explaining their processes in detail. They help. Have a blessed day! 🥰🥰🙏🙏🧶🧶🐑🐑
This looks like an awesome pattern! I’m starting it immediately. However, I notice in your comments about the chart that there is an option for a third contrasting colour, and that those boxes would be in gray. But I only see black and white on the chart you provided. Would you be able to post the chart with the three colour options? Thank you!! I love this pattern!
Glad you like it! I’ll see what I can do about getting the tri-color chart up in the next couple of days.