The Pineapple & Pine Cowl: Free Crochet Pattern
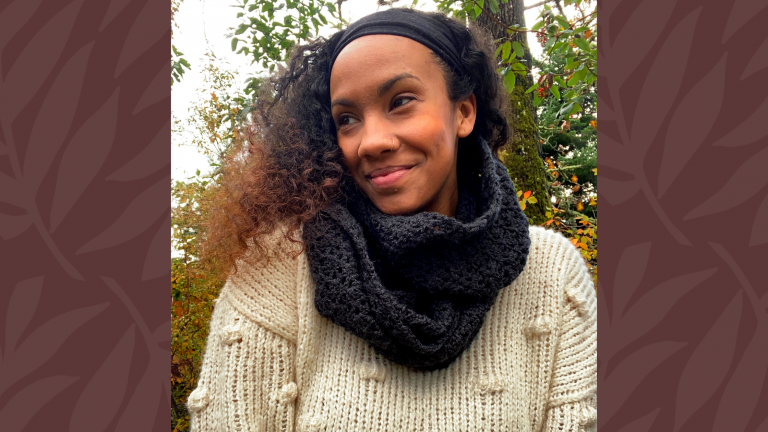
Fall is officially here! That means all the cozy things are coming out of the closet, including the hats and scarves. Earlier this year, I designed a gorgeous cowl scarf for a Pineapple & Pine crochet-a-long. This was part of a collaborative design with Sarah from A Plush Pineapple, who designed a coordinating wrap scarf. When we originally did the CAL, you could only find pieces of the pattern split between our two blog. But today I’m going to be sharing the Pineapple & Pine Cowl in full!
The following is a free pattern available for use on my website, if you would like to purchase a detailed, ad-free PDF version of this pattern, please visit my Etsy or Ravelry shop. All pattern rights reserved.

**This site contains affiliate links to products. I may receive a commission for purchases made through these links. This is a great way to support my small business AND get the supplies you need for your project!**
The Pineapple & Pine CAL
If you haven’t heard already, recently Sarah from The Plush Pineapple and I put our heads together this past year to create Pineapple & Pine! This little venture is intended to be a go-to source for blog hops, crochet-a-longs, and design collabs. You can find some more details right here. For our very first CAL, we each designed a beautiful, textured crochet scarf in a different style and gave you a new section to work on each week.
Now if you’re not familiar with that term, I’m here to help! A Crochet-a-Long, or CAL, is when a group of makers gets together and all makes the same project. This can look different depending on the group. Perhaps they all pick a design of choice from a particular library, or they all make whatever they want in a certain genre. The particular style of CAL that we use for Pineapple & Pine is a set project with weekly updates for the next section.
Joining one of our CAL’s is super easy! Just follow along with each week’s new section and post pictures as you go. Use the hashtags #pineappleandpinecal to make sure your pictures are entered in that month’s giveaway prize. Oh, did I mention there would be prizes! And if you’d like an extra outlet to share pictures, ask questions, and see other people’s projects as we go, check out the Pineapple & Pine Facebook group.
The Pineapple & Pine Cowl and Scarf
So with all that said, the Pineapple & Pine Cowl and Scarf CAL was actually sort of a 2-for-1. Funny story, when Sarah and I started this design, we settled on “scarf”. As we were choosing stitches and deciding on a layout, we realized that I was thinking a cowl scarf and she was thinking a long, wrap scarf. We mulled over which direction to go and finally decided to just do them both! So whether you prefer a cowl or a wrap, there’s a scarf here for everyone!

Both styles use the same stitches and the same order. It uses four different stitch sections to the center and then reflects those stitches back to the opposite side. We varied the yarn weights and stitch counts, as well as the number of row repeats. So you end up with two similar, but very different results. While it is definitely not a beginner level pattern, there is lots of help with each of the stitches. So even if you’re not familiar with them all, you can definitely get some help from a tutorial video.
Here on my blog you will be able to find the full Pineapple & Pine Cowl Pattern. The finished cowl is about 12″ high and about 28″ around. It is designed for an adult but does have some notes about how to adjust the stitch count. If you’re looking for the scarf, click the button below to head to Sarah’s blog post for the free pattern.
The Project Inspiration
Sarah and I decided to use elements to reflect ourselves and our brands in this particular project. I took inspiration from my PNW roots and chose stitches that reflected an more nature-oriented theme. Sarah, of course, took her stitches in a more tropical direction. She chose stitches that reminded her of the beach and, you guessed it…pineapples!
My Stitch Inspiration
My first stitch is nicknamed the Mountain Stitch. I grew up in Washington state, and if you’ve ever been to this region, you might be familiar with the Cascades. This mountain range runs from Canada down to Northern California and includes Mt Rainier, which I’ve mentioned before in my Mt Rainier Square. This stitch, which we have nicknamed the Mountain Stitch, has a zigzag effect reminiscent of the peaks and valleys of a mountain range.
And my second stitch is the Star Stitch. The inspiration is brought to you by the beautiful night sky! I think one of my favorite things is being outside at night to enjoy the crisp, quiet air and the clear night sky. In an area known for outdoor adventure, camping out under the stars seemed like a perfect inspiration. The star stitch also happens to be one of my favorites. I’ve incorporated it into several designs like the Great Star Beanie, and the Ocean’s Breath Wall Hanging.
About the Yarn
For this project, I used Lion Brand Jeans yarn. This is a worsted weight yarn that definitely leans towards the lighter side of the category. I love this yarn for this particular project because it had such great drape when it was finished. However, most worsted weight yarns will meet gauge. In fact, I did a scrap version of this cowl and was able to use Lion Brand Heartland as well as some doubled fingering as a substitute for the Jeans yarn.
Beside Lion Brand Heartland and Jeans, another similar weight yarn with great drape is Mighty Stitch yarn from WeCrochet. I used this yarn to design blanket squares for the Falling for Textures Blanket CAL. It’s really nice to work with, plus it has a little wool in it for extra warmth. This yarn also has a bit of a sheen to it so your finished projects will have a bit of wow factor.
Love it? Pin it for later!

Materials Needed
- 2 Skeins of Lion Brand Jeans yarn (or 400 yds of worsted weight)
- Size I (5.5mm) hook
- Stitch Marker (optional)
- Scissors
- Tapestry needle
Stitches Used
- DTR – Double Treble Stitch
- DTR Group – Double Treble Group
- DTRGroup2Tog – Double Trouble Group Two Together
- HDC – Half Double Crochet
- Sl St – Slip Stitch
- Ch – Chain
- FHDC – Foundation Half Double Crochet
- YO-Yarn Over
- DC – Double crochet
- FPTR – Front post treble crochet
- FPTR2tog – Front Post Treble crochet two together
- FO – Finish off
Gauge
Note: Due to the variety of stitches throughout, gauge is based on the most commonly used stitch.
HDC 14 stitches, 12 rows = 4″ square
Pattern
OCEAN RIPPLES SECTION
This section uses a combination of half double crochets and slip stitches to create a subtle rippling texture on both sides of your work.
Row 1: Fhdc 97 or Ch 98, Hdc in 2nd ch from hook and each chain across. (97)
Row 2: Ch 1 and turn. Hdc in first stitch. *Sl st in following stitch, hdc in next stitch.* Repeat from * to end of the row. (97)
Row 3: Ch 1 and turn. Sl st in first stitch. *Hdc in following stitch, sl st in next stitch.* Repeat from * to end of the row. (97)
Row 4-5: Repeat Row 2-3

MOUNTAIN SECTION
This section uses a variation of the 3 Strand Zigzag stitch to create the illusion of mountain peaks and valleys. For further help with this stitch, check out this stitch tutorial or this tutorial video.
Row 1: Ch 1 and turn. Hdc in first stitch and each stitch across.
Row 2: Ch 5 (counts as first Dtr). Sk 3 st. Work 1 Dtr Group into next stitch. *Ch 5. Work first half of DtrGroup2Tog in same stitch, sk 5 st, finish DtrGroup2Tog in next stitch.* Repeat from * to * until 3 stitches remain. Ch 5. Begin working 1 Dtr Group into same stitch as previous DtrGroup2Tog until last 4 loops remain on hook. Work 1 Dtr in last stitch, yarn over, and pull through 5 loops on hook. (15 DtrGroup2Tog, 2 Dtr Group, 2 Dtr)
Row 3: Ch 1 and turn. Hdc in top of first Dtr group. *Hdc 5 in the ch 5 space. Hdc in the top of the DtrGroup2Tog* Repeat until you reach the last Dtr group. Skip Dtr group and Hdc 1 in the 5 ch of the beginning ch from previous row. (97)
Row 4: Ch 1 and turn. Hdc in first stitch and each stitch across. (97)

UNDER THE STARS SECTION
This section uses the star stitch. For further help with this stitch, check out this stitch tutorial or this tutorial video.
Row 1: Complete a row of star stitches doing the following:
Ch 3. Insert hook in 2nd ch from hook, pull up a loop. Then insert hook into next ch, pull up a loop. Insert hook and pull up a loop over next 3 st. (6 loops on hook) Yarn over and pull through all loops on hook. Ch 1 to close star stitch (eye of star stitch).
*Insert hook into eye of star stitch, pull up a loop. Then insert hook between the last two spikes of the previous star stitch, pull up a loop. Insert hook in the same stitch as the last spike of the previous star stitch, pull up a loop. Insert hook and pull up a loop over next 2 stitches. (6 loops on hook) Yarn over and pull through all loops on hook. Ch 1 to close star stitch.*
Repeat from * across until you finish the last star stitch. Hdc in last stitch (same stitch as last star stitch). (48 star stitches)
Row 2: Ch 1 and turn. Sk hdc from previous row. 2 Hdc in the eye of each star from the previous row. Hdc in the top of last star stitch. (97)
Row 3-4: Repeat Rows 1-2

BE A PINEAPPLE SECTION
This section uses the Diamond Trellis stitch to mimic the texture of a pineapple. For further help with this stitch, check out this tutorial video.
Row 1: Ch 1 and turn. Sc in first stitch and each stitch across. (97)
Row 2: Ch 2 and turn. Dc in first stitch and each stitch across. (97)
Row 3: Ch 1 and turn. FPTr around 2nd sc from Row 1. On current row, sk 1 st, sc 3. *Begin FPTr2Tog around same stitch as previous FPTr, sk 3 sc from Row 1, finish FPTr2Tog around next sc from Row 1. On current row, sk 1 st, sc 3.* Repeat from * to * until 1 stitch remains. FPTr around same stitch as the previous FPTr2Tog until last 2 loops remain on hook, sc in last stitch and pull through all 3 loops on hook.
Row 4: Ch 2 and turn. Dc in first stitch and each stitch across. (97)
Row 5: Ch 1 and turn. Sc 2. *Begin FPTr2Tog around top of same FPTr from previous cable row; finish FPTr2Tog around next FPTr from previous cable row. On current row, sk 1 st, sc 3.* Repeat from * to * across. Sc in last two stitches.
Row 6: Ch 2 and turn. Dc in first stitch and each stitch across. (97)
Row 7: Ch 1 and turn. FPTr around top of first FPTr from previous cable row. On current row, sk 1 st, sc 3. *Begin FPTr2Tog around same stitch as previous FPTr, finish FPTr2Tog around next FPTr from previous cable row. On current row, sk 1 st, sc 3.* Repeat from * to * until 1 stitch remains. FPTr around same stitch as the previous FPTr2Tog until last 2 loops remain on hook, sc in last stitch and pull through all 3 loops on hook.
8-9: Repeat Rows 4-5
Row 10: Ch 1 and turn. Sc in first stitch and each stitch across. (97)

Repeat UNDER THE STARS SECTION
MOUNTAIN SECTION 2
The second Mountain Section varies slightly from the first. The reason for the slight difference is to mirror the stitches from the opposite side as we work back towards the Ocean Ripple Section.
Row 1: Ch 1 and turn. Hdc in fi rst stitch and each stitch across.
Row 2: Repeat Row 1
Row 3: Ch 5 (counts as first Dtr). Sk 3 st. Work 1 Dtr Group into next stitch. *Ch 5. Work fi rst half of DFPTr2Tog in same stitch, sk 5 st, fi nish DFPTr2Tog in next stitch.* Repeat from * until 3 stitches remain. Ch 5. Begin working 1 Dtr Group into same stitch as previous DFPTr2Tog until last 4 loops remain on hook. Work 1 Dtr in last stitch, yarn over, and pull through 5 loops on hook. (15 DtrGroup2Tog, 2 Dtr Group, 2 Dtr)
Row 4: Ch 1 and turn. Hdc in top of first Dtr group. *Hdc 5 in the ch 5 space. Hdc in the top of the DtrTog.* Repeat until you reach the last Dtr group. Skip Dtr group and Hdc 1 in the 5 ch of the beginning ch from previous row. (97)
OCEAN RIPPLES SECTION 2
The second Ocean Ripples Section varies slightly from the first. The reason for the slight difference is to mirror the stitches from the opposite side as we work toward the end.
Row 1: Ch 1 and turn. Hdc in first stitch. *Sl st in following stitch, hdc in next stitch.* Repeat from * to end of the row. (97)
Row 2: Ch 1 and turn. Sl st in first stitch. *Hdc in following stitch, sl st in next stitch.* Repeat from * to end of the row. (97)
Row 3-4: Repeat Rows 1-2
Row 5: Ch 1 and turn. Hdc in first stitch and each stitch across.
Finishing
1) Optional: Block your finished piece.
2) Fold scarf in half so that the two short ends meet.
3) Stitch the two ends together using the mattress stitch.
4) Tie off and weave ends.

Final Thoughts
With the release of our individual scarf patterns in mind, Sarah and I began brainstorming some matching accessories. You can expect to the the Pineapple & Pine Beanie debuting on the blog tomorrow! The beanie will be available in both worsted weight and bulky weight. So you can easily pair it with either the cowl or scarf.
AND Sarah will be releasing her Pineapple & Pine Ear Warmer in the next couple of weeks. I’ll be sure to share a link right here when its ready!
If you decide to make any of these projects, be sure to tag me on Instagram at @craftingforweeks. I love to see and share your work! Until then, Happy Crafting!
Kelsie


One Comment
Comments are closed.