How to Make Faux Fur Poms: Photo & Video Tutorial
I’ve been seeing this questions pop-up more and more lately…how do you make a faux fur pom?! Well, after making them for the past few years for my own hats, I decided it was time to do a little tutorial. Don’t get me wrong, there’s plenty of great tutorials out there already. But today I’m going to show you MY favorite way to make faux fur poms. I hope you love this method too!

**This site contains affiliate links to products. I may receive a commission for purchases made through these links. This is a great way to support my small business AND get the supplies you need for your project!**
PS…You can also buy finished poms in my Etsy shop! Check them out here!
Faux Fur Poms vs Yarn Poms
In the past few years, I’ve seen many makers switching from yarn poms to faux fur. When I first started crocheting, I made all the poms for my hats with yarn using a Clover Pom Maker. It was the cool thing to do. But as faux fur has become more trendy, more customers prefer the faux fur poms to the yarn ones.
While I think both styles are great, I have to admit that I find faux fur poms quicker and easier to make than yarn poms. And if you can make your own, the cost you can keep your costs pretty low. Don’t get me wrong, I still make and use yarn poms regularly (so you might see another tutorial on those). But ultimately I think faux fur poms are a great options for makers and they really do wonders for marketing your hats!
Perfecting My Method
Now I thought I should mention that I have tried several different methods of making faux fur poms. When I first started, I was cutting the fur in perfect circles, and stitching them closed with thread. This methods works! I hate it though. Tracing and cutting the circles is tedious and most of the time I snapped the thread while stitching and had to start over. I even upgraded from sewing thread to crochet thread or embroidery floss…still snap it sometimes. Ugh.
So finally after with some brainstorming with other makers and a little trial and error, I figured out how to make faux fur poms with bulky yarn! In fact, my favorite yarn to use for poms now is Bernat Maker Home Dec. I love the sturdiness and grip when you tie it on. And if you’re feeling extra fancy, grab some pom buttons from Angie & Britt to secure on the inside of your beanie.
Sourcing your Faux Fur
How Many Poms do You Need?
The first thing to consider is how many poms you’re going to need. Depending on the width of your fabric, a little bit can do a long way! And if you have a number in your head already, you won’t panic at the fabric counter and get too much faux fur. Just for reference, I like to cut my poms in 6″ squares. So a yard will get me about 6 poms across. And fabric is generally about 54″-60″ wide so I can get 9 – 10 poms down. On a perfect yard cut of fabric I can get 60 poms!
Helpful Hint: If you just need one or two poms, most fabric stores sell small sheets of faux fur in the craft section!
Pile Length Matters!
When you’re shopping online, you’ll want to pay attention to the pile length listed. This is how long the actual fur is going to be. My favorite fur poms have a pile length around 3″. Shorter pile lengths work, but they don’t have that fluffy luxurious look when you’re done. When you’re shopping in store, you can see and feel the fabric so you have an idea of how a finished pom will look. But when you’re ordering online, that pile length number can really help you out.
Feel of your Fabric
I know you want the luxurious faux fur poms you see on Instagram. You get those by choosing the right fabrics! The best way to know that you’re getting a good fur is to either feel it in person or order a sample before you buy. Sometimes little things like “Luxury” fur vs “Fashion” fur in the title can help to point you in the right direction. I have also had good luck with keywords like “Fox”, “Coyote” or “Lux” fur. If I’m looking online, I also like to see a little bit of sheen to the fabric in the photos. Also, hate to say it, but the price tag can also be an indicator of quality.
Where to Buy it!
I like to buy my fabric in person. Hobby Lobby has a brown faux fur that I’m particularly fond of. I also have had good luck going into Joann Fabrics and just browsing the shelves. I even found an amazing cut of faux fur in the clearance bin once! The nice thing about shopping in-store is that you can pretty much choose any amount of fabric that you’d like. I can go into the store and ask for a 12″ cut of fabric and walk out with enough fabric for a dozen poms and a pretty small receipt. Many of the online shops have 1-yd or 2-yd minimums. I’ve seen faux fur range from about $15-$75 per yard so if you’re wanting more than one colors, the totals can add up quick.
BUT I know you can find way more faux fur colors online. Aside from the box stores I already mentioned, one place you might not think to shop is Etsy. The nice thing about Etsy is that you can ask questions directly to the shop owner before you buy. Some makers will even sell the pre-cut squares of fur so all you have to do is stitch them up! Another popular one in the maker community is Big Z Fabrics. Fabric.com is another good one to check. Fabric stores in general will usually have an option to order a sample or swatch before you buy. You can also roll the dice with Amazon, but be sure to read those reviews!
Materials Needed
- Faux fur fabric (approx 6×6″ square per pom)
- Bernat Maker Home Dec yarn (or yarn/cord of choice)
- Sharp scissors or Razor knife
- Rotary Cutter and Preforated Blade
- Optional: Rotary Cutting Set w/mat and ruler and Preforated Blade
- Tapestry Needle
- Optional: Sewing Needle (if you skip rotary punch step)
Step-by-Step Tutorial
Step 1: Pick your Pom Size
Like I mentioned before, you’ll want to decide how large you want your poms to be. I tend to like 6″ squares for most of my poms. Sometimes, if I have leftover cuts of fabric in odd sizes, I’ll do 5″ squares for toddler hats or even smaller for mini poms. When I’m working from a fresh cut of fabric, I plan around cutting 6″ square pieces.

Step 2: Cut your Faux Fur
When you cut your fur, you will need to cut it from the back. This will help you to avoid cutting the actual pile of the fur. A pro tip is to use a sharp razor knife and cut just the along the backside of the fabric. Be sure not to press down too hard and cut through the pile of the fur though. If you’re using scissors, get the tip of the scissors under the pile of the fur and cut just the fabric backing.
You can use a fabric marker to mark out your squares from the back before cutting. I prefer to skip that step and just measure as I cut. I use a Fiskars ruler as a straight edge as I cut.

Step 3: Rotary Punch your Fur
Use a rotary cutter with a perforated blade to go around the outside edge of your square, about 1/4″ from the edge. Adding this step to your pom making will allow you to use a tapestry needle to sew your pom closed. This means that you can use any yarn or cord that you can thread onto a tapestry needle; even super bulky!
Note: If you opt to skip this step, you will need to use a sewing needle to sew up your pom. I recommend threading the sewing needle with the sturdiest cord that will fit through the eye of the needle, like a waxed cord.

Step 4: Sew up your Pom
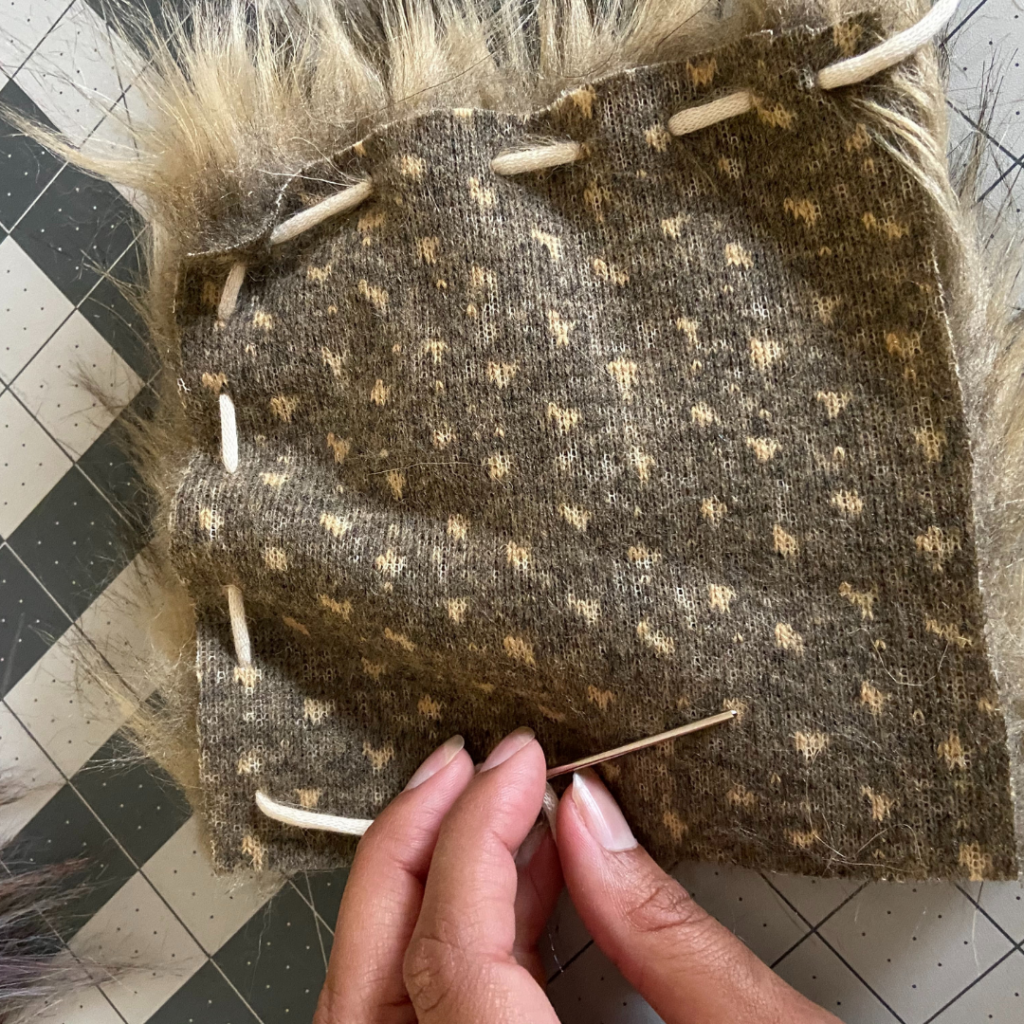
Cut a 18-24″ piece of the Bernat Maker Home Dec Yarn, or other yarn or cord of your choice. Using a tapestry needle, weave in and out of the holes created by the rotary punch.
Helpful hint: If you have trouble finding a hole, give your fabric a gentle pull. This will open up the hole left by the punch and make it more visible.

Step 5: Stuff and Cinch
When you have gone all the way around, lightly cinch your yarn. Stuff the center of the pom with some polyfil. Be sure not to overstuff, as it will be difficult to close your pom. When you have enough stuffing, tightly cinch your yarn to close up the pom.

Step 6: Tie it up!
Triple knot that pom! I try my best to keep fur out of my knots, but its somewhat inevitable. Do your best to get a nice secure double knot and then add one more knot for good measure.

Step 7: Clean up
I’m not gonna lie, making faux fur poms is messy business. I try to do it in batches so I only have to vacuum once. Once, I’m finished making a pom, I like to give it little shake to fluff it up and get rid of excess fur that may have fallen off. You might also want to give your cords a little trim if they’re not even after tying them. Then vacuum, because its guaranteed there’s bits of fur EVERYWHERE!
Video Tutorial
If you need more of a breakdown of the process, check out this video tutorial. I walk you through how to cut the fabric, using a rotary punch, sewing up your pom and tying it off! Plus a little bonus footage of how to use a button to attach the pom to your hat.
Love this Tutorial? Pin it for Later!

Final Thoughts
I hope you find this tutorial helpful. I love being able to make my own faux fur poms. They’re ready whenever I need them. Plus I can stick my excess poms in my Etsy shop. And now you can too!
If you’re looking for something fabulous to put your new faux fur poms on, check out some of these free beanie patterns…
Until next time, Happy Crafting!
Kelsie


2 Comments
Comments are closed.