
Crochet an Easy Footbag Toy
The Smiles & Hugs Footbag is a fun take on the classic footbag game sack. This crochet ball shape is customize-able with some fun color-work graphs, including a set of alphabet letters. This crochet footbag is made with cotton yarn and filled with rice, so you can also warm them in the microwave and keep hands and pockets warm. Whether you’re making some custom Valentines Day gifts or just in need of a new game toy, this quick pattern is perfect for you!

Before you begin…
You can find the ad-free PDF version of this pattern in my Ravelry shop or my Etsy shop. This PDF includes all the alphabet letter graphs for this pattern!
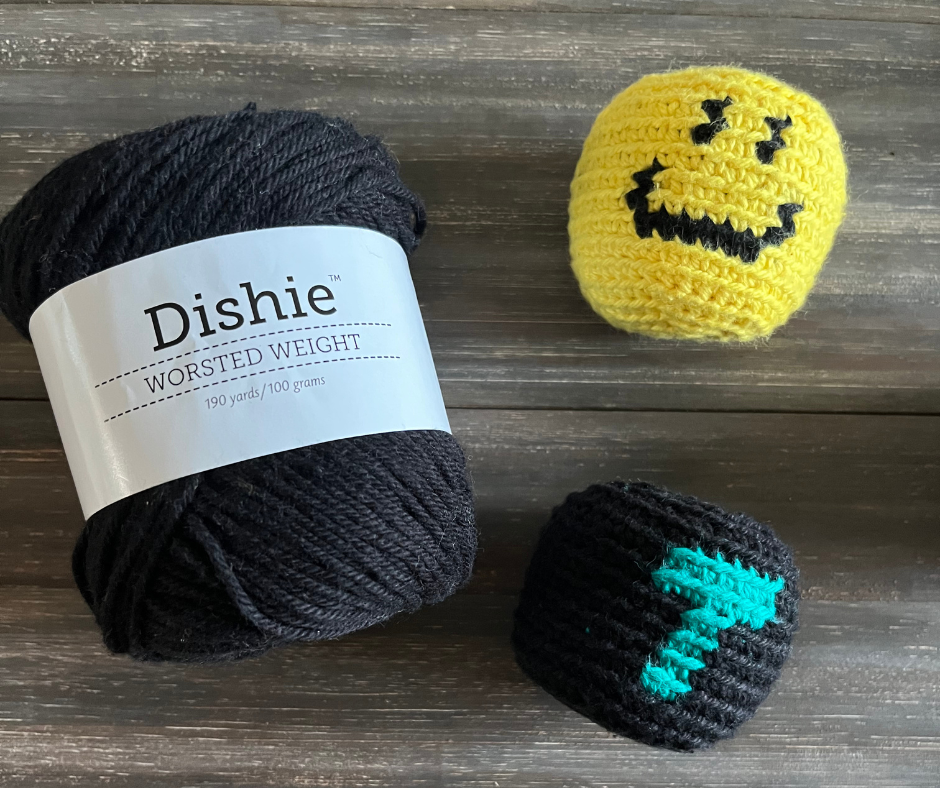
Shop the recommended yarn, Dishie Cotton!
You’re also gonna need a 3.5mm hook, check out this hook set!
Be in the know about all the latest and greatest here at Crafting for Weeks by signing up for the newsletter below!
**This site contains affiliate links to products. I may receive a commission for purchases made through these links. This is a great way to support my small business AND get the supplies you need for your project!**
What is a “Footbag”?
A footbag is a small fabric pouch or sack that is commonly filled with pellets or sand. This pouch is passed back and forth between players by kicking it with the foot or hitting it with the leg. It is often referred to as “hacky sack”, but this actually just a trademarked name for a footbag.
While footbags are typically used for the game of footbag, they are often popular for juggling or as fidget toys.

About the Smiles & Hugs Footbag
The Smiles & Hugs Footbag is essentially a crochet ball that is filled with rice. I designed this pattern as a quick make for Valentine’s Day gift for my kiddos. If made with cotton yarn and rice (which are both microwave-able), these little fidget balls double as hand warmers in the winter. A quick 20 seconds in the microwave keeps them warm for about 10-15 minutes!
These also incorporate a bit of crochet color work. Because they were originally for Valentine’s gifts, I created a heart graph. And to keep it a little more versatile, I also added a smiley face graph. In addition to these two graphs, there is also a full set of alphabet letters to customize your crochet footbag even more! Don’t be too intimidated by the color work; there’s only 6 rows and you’ll be done with this project in no time.
Love it? Pin it for Later!

About the Yarn
This project calls for worsted weight cotton yarn. I used Dishie Yarn from WeCrochet for this project. Its 100% cotton, durable, comes in tons of colors, and its really affordable. It’s one of my favorite cotton yarns to use…which means I had lots of yarn scraps on hand. You won’t need much for this project, so it’s a great time to do some scrap busting!
If you want to substitute yarn, I recommend choosing 100% cotton yarn (CYC Weight 4). Cotton yarn is durable and is going to hold up better to use than most other materials.
Filling your Footbag
This crochet footbag uses a few tablespoons of uncooked rice as a filling instead of pellets or sand. The reason behind this is simply to make is microwave safe. If you opt to use a material other than rice, definitely DO NOT microwave it without doing your research on the safety.
I used an inner lining to make sure no rice came out of my footbag during play. This step is optional, but highly recommended. You can either make a small liner pouch with a bit of cotton fabric (very similar to making a Faux Fur Pom Pom) or grab a sock without a buddy from your laundry basket and give it a new use!
Once you have filled your inner lining with rice and closed it, you can simply place it inside and crochet around it to close up your footbag.

You Might Also Like…
If you’ve got smiles and hugs on your mind, you might like some other lovable gift ideas. Check out some other free patterns on my blog by clicking the photos below!


Let’s Get Started…
Materials Needed
25 yds of Dishie Cotton yarn in Main Color (or other 100% cotton yarn)
10 yds of Dishie Cotton yarn in Contrasting Color (or other 100% cotton yarn)
Size 3.5mm crochet hook
Tapestry needle
Stitch Markers
Scissors
Cotton Sock or 6”x6” square of cotton fabric
Sewing needle
Thread
2-3 Tbsp of rice (or other stuffing material)
Stitches Used
MC – Magic Circle
Ch – Chain
Sc – Single Crochet
Sc BLO Inc – Single Crochet in Back Loop Only Increase
Sc BLO Dec – Single Crochet in Back Loop Only Decrease
Skill Level
Experienced Beginner
Finished Measurements
2.25”w x 2.25”h
Notes
- This pattern is worked in a continuous round. It is recommended that you use a stitch marker to mark the first stitch of the round.
- The color work on this pattern is worked from a graph in 18-stitch increments. If desired, you can work two graphs for each sack creating a picture or letter on the front and back of the sack. If working two graphs, it may be helpful to place an additional stitch marker in the 19th stitch of your round to distinguish start and end points of your two graphs.
- This sack is made with cotton filled with rice for weight and microwave warming. If you opt to used another material (beans, poly pellets…etc), do not microwave unless using a microwave safe material.
Pattern
INCREASING SECTION
Using your main color and a 3.5mm hook. MC with yarn and ch 1.
Round 1: Sc BLO 12 in MC. (12)
Round 2: *Sc BLO 1, Sc BLO Inc.* Repeat from * to * around. (18
Round 3: *Sc BLO 2, Sc BLO Inc.* Repeat from * to * around. (24)
Round 4: *Sc BLO 3, Sc BLO Inc.* Repeat from * to * around. (30)
Round 5: *Sc BLO 4, Sc BLO Inc.* Repeat from * to * around. (36)
Round 6: Sc BLO in each stitch around. (36)
TAPESTRY SECTION
Work 6 rounds of Sc BLO according to the following instructions.
Each square on the graph represents one Sc BLO stitch. White squares are your main color while black square are you contrasting color. Beginning in Row 1, Column 1, work one stitch per square across the row changing colors as the graph changes. In the stitch before a color change, you will follow the technique for “Changing Colors”. When you reach the end of the graph, you can begin a second graph for the back side, or work Sc BLO stitches for the remainder of the round. Begin the next round on Row 2, Column 1. Continue working across the graph rows for six rounds. (Note: for Letter Graphs, purchase the ad-free PDF pattern in my Ravelry shop or my Etsy shop )


FILLING
Before you begin decreasing, you will need to fill your footbag. If you want your finished piece to be microwaveable, you will need to use cotton and rice. I chose to add a liner to the filling to ensure that no rice comes out of the footbag. The lining optional, but recommended. If you are opting to not line your footbag, simply put the rice directly into the working piece and move onto DECREASING SECTION.
NOTE: If filling with other materials, DO NOT microwave unless you have verified that substituted materials are microwave safe.
Sock Method
Fill a small cotton sock with approx 2-3 tablespoons of uncooked rice. Using a sewing needle and thread, stitch across the sock to enclose the rice. Cut off excess sock material and put into the center of crochet footbag. Continue to “DECREASING SECTION”.


Cotton Fabric Method
Cut a 6”x 6” square of cotton fabric. Using a sewing needle and thread, loosely stitch around the edge of the entire square, roughly 1/4” from the sides. Lightly pull the two tail ends of the thread to cinch the fabric into a small pouch shape. Fill the pouch with 2-3 tablespoons of uncooked rice. Cinch tightly and tie to close. You may also sew around the edge with the remaining thread to secure the pouch closure. Put into the center of crochet footbag. Continue to “DECREASING SECTION”.


DECREASING SECTION
Continuing working with your main color only.
Round 1: Sc BLO in each stitch around. (36)
Round 2: *Sc BLO 4, Sc BLO Dec.* Repeat from * to * around. (30)
Round 3: *Sc BLO 3, Sc BLO Dec.* Repeat from * to * around. (24)
Round 4:*Sc BLO 2, Sc BLO Dec.* Repeat from * to * around. (18)
Round 5: *Sc BLO 1, Sc BLO Dec.* Repeat from * to * around. (12)
Tie off leaving a long tail. Using a tapestry needle, weave the tail under the front loop of each stitch around. Pull the tail tightly to close. Tie off and weave in end.


USING YOUR FOOTBAG
You can now use your footbag to play a passing game, squeeze as a fidget toy or as a hand warmer. To warm, place in microwave for 15-20 seconds. Be sure to monitor your footbag during the warming process.

Final Thoughts
Thanks for checking out the Smiles & Hugs Footbag! I hope you have fun making these for the special people in your life. Be sure to tag me in your finished makes at @craftingforweeks on Facebook or Instagram. Use hashtag #smilesandhugsfootbag for a chance to be featured!
Until next time, Happy Crafting!