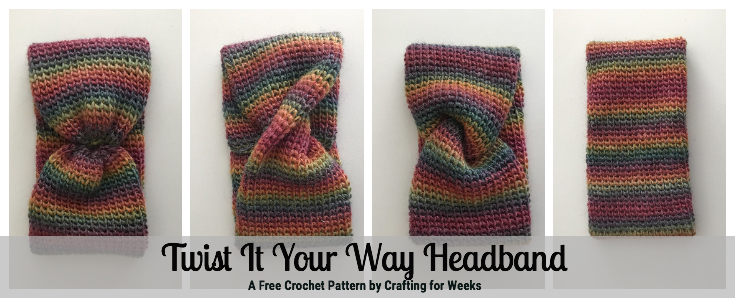
How to Crochet a Twisted Ear Warmer
I know many of you have seen the fabulous turban style headbands that are so popular this season. The big chain stores have them, the handmade shops have them; they’re basically the thing to have right now. I’ve been loving the knit headbands, but I’m not the fastest knitter. I’m always looking for a way to make things with a hook instead of needles. So today I bring you the Twist It Your Way Headband. You can decide what kind of headband style you like, have the look of knit, AND do it with your crochet hook. Talk about having your cake and eating it too!
If you would like to purchase the printable, ad-free PDF, you can find it in my Ravelry or Etsy shop.

About the Headband
So this headband is essentially just a tube that you will twist at the end and seam. You’re going to be crocheting in the round to form a long piece and then deciding how you want to twist it before seaming the ends together. When finished with the tube, I opted to slip stitch each end closed. This makes seaming a bit easier.

About the Stitch
The magical secret to the knit look of this headband is the waistcoat stitch. The waistcoat stitch is just a variation of the single crochet. The main difference between waistcoat stitch and a basic single crochet is the placement of the stitch. You’re going to be placing your stitches between the posts of the stitch below. This creates a V-shape to the stitches and allows them to stack on top of one another.

Check out this video from Make a& Do Crew to see Waistcoat Stitch in action!
One thing I will mention about waistcoat stitch is that the stitches tend to lean a bit one way the longer your piece is. I just readjusted the tube before slip stitching the ends closed. It might still try to lean on you, so if it’s still giving you problems, I recommend blocking the piece.

About the Twists
Once your tube is done, you’re ready to twist (or not! A flat headband is just as fabulous!). I’ve included a couple basic twisting methods, but I’ll also link you too some helpful videos if you’re more of a “see it done” type of person. I’m working with a contrasting color so you can see the stitches more clearly, but with your piece, you’ll want to use the leftover tail to seam your piece so it’s not visible.

Sizing
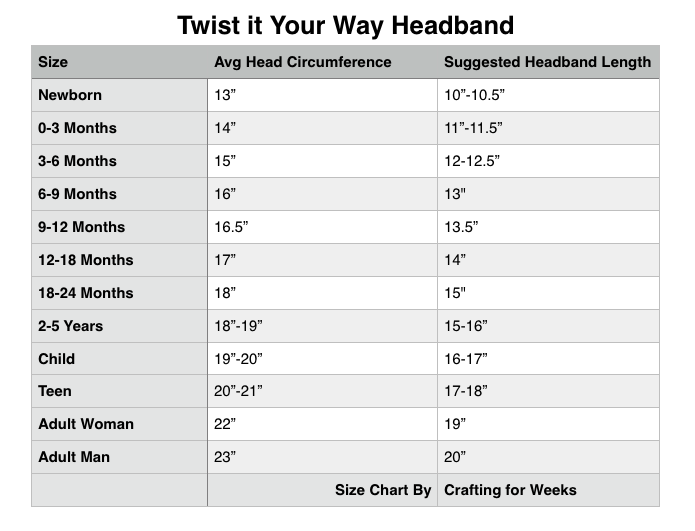
This pattern can easily be adjust to any size. I’m going to provide a size chart to give you some suggestions for how long to make your piece for each size. I recommend making the tube a bit thinner for baby and kids sizes. I’ll provide some stitch suggestions below. They’ll be based on my gauge, but the best way to make sure its the size you want is to take a quick measurement as you work.
Final Thoughts
I hope you love this headband. I’m really excited to be able to provide the crochet crowd with something fun and versatile like this. You can create some popular styles of the season without learning to knit or having to invest in a knitting machine.
If you’d like to check out another fun ear warmer, be sure to take a look at The Crossed Pair Headband. I’m hoping to update that one with more sizes very soon, so keep an eye out!
I’d love to see your finished work too! Tag me on Instagram @craftingforweeks and use the hashtag #twistityourwayheadband so I can see your work. Until next time, Happy Crafting!
Kelsie

Materials Needed:
90-225 yds of Worsted Weight Yarn
Size J (6.0mm) crochet hook
Optional: Size K (6.5mm) or L (8.0mm) crochet hook
Optional: Stitch Marker
Measuring Tape
Tapestry needle
Scissors
Stitches Used:
Sl St – Slip Stitch
Ch – Chain
SC – Single Crochet
Whip Stitch
Gauge: = (With J hook, working in rounds using Waistcoat stitch) 14 SC stitches x 16 rows = 4” square
Sizing Chart:

Pattern
Headband Width (3″, 4.5″)
Ch (24, 34).
Join with a sl st to first chain to form a circle, being careful not to twist.
Row 1: Ch 1. SC in each chain around. Mark first stitch with a stitch marker, if desired. (24, 34)
Row 2: Using Waistcoat Stitch, SC in between the posts of each stitch around. (24, 34)
Repeat Row 2 until work measures Suggested Headband Length from the chart.
Holding tube closed, slip stitch across each end. Leave a long tail on one side for seaming.
Choose your Twist method and close headband.
Cinched Center
With this one, I wove in the tail in and out up one side and back down the opposite end. When you pull it tight, it will cinch the center closed. Then you’ll just want to take your tapestry needle and go around a few more times to secure it, before weaving ends.

Flat Twist
This is one is super simple. You just twist the piece once before holding the ends together and seaming it closed. Once seamed, you’ll flip it inside out so that the seam is facing inward.

Bow Twist
This twist gives a sort of bow effect. It looks complicated, but its so simple. First, you’ll fold the two ends in half and then interlock them. The end of one piece will be sandwiched in the center of the other end. Once you have them in place, you’ll seam through all four pieces. When the seam is secure, you’ll flip the headband inside out so that the seam is on the inside.

No Twist
If you don’t want a twist at all, just hold the ends together and seam them using the whip stitch.


I’m going to try this for a cowl. Thank you because I love the bow twist!
Sounds amazing!
What yarn is that? Its beautiful! As is your pattern! Thank you for sharing!
This is Yarn Bee Chloe in the colorway Pick of the Bunch. It’s carried at Hobby Lobby. Similar yarn might be Red Heart Unforgettable.
Do you think Caron simply soft would work? Too thin?
I think it would work great. I think thinner yarns would actually be better since this stitch makes a pretty dense fabric.
Have you got the knitting pattern for this?
I have made this on a knitting machine, but I’m afraid I don’t hand knit well enough to write knit patterns. I know there’s some makers out there that do! Feel free to send me an email and I’ll help you find some.