
Crochet a Beautiful Scrap Yarn Blanket
Today I’m sharing a something that nearly every crocheter will need eventually…a great scrap buster project! We all tend to have a little bit of yarn left over after each make, and if you’re anything like me, it tends to accumulate over time. The Stacking Diamonds Blanket is the perfect way to turn that scrap yarn into a beautiful new piece. Or if you’re starting fresh with brand new yarn, this fun blanket pattern is just asking for a creative color palette! (Psst…I’ve even include a fun coloring sheet to help you plan it!)
I’m so excited to share this blanket pattern with you!

Before you Begin…
You can find the ad-free PDF version of this pattern in my Ravelry shop or my Etsy shop. For the free version, keep scrolling!
This pattern uses worsted weight scrap yarn. But you can also shop yarn! Here’s a few of my favorites…Brava Worsted, Basic Stitch, Heartland, & Wool-Ease.
You’re also going to need a 5.5mm hook and a 5.0mm hook (optional). Check out this hook set from WeCrochet!
Be in the know about all the latest and greatest here at Crafting for Weeks by signing up for the newsletter below!
**This site contains affiliate links to products. I may receive a commission for purchases made through these links. This is a great way to support my small business AND get the supplies you need for your project!**
What is Scrap Busting?
Scrap busting or a scrap buster project is simply a design or project that uses up the materials leftover from a variety of other projects. It is also sometimes referred to as stash busting, as using up the leftover materials will eliminate or “bust” your stash of scrap yarn, fabric, or other supplies.

Why is Scrap Busting Important?
Scrap busting projects are great for a variety of reasons. First and foremost, you’re reducing waste. Instead of throwing away little bits of yarn, you’re turning them into a useful item. Many people even like to donate these items since they’re often made with only the additional cost of your time. These projects are also a great way to practice new stitches and techniques before moving onto a more complex pattern.
I personally love scrap projects because they’re a bit sentimental. Each bit of leftover represents a project I completed. Putting them all together creates a useful keepsake of sorts; a compilation of a large group of my work.
About the Blanket
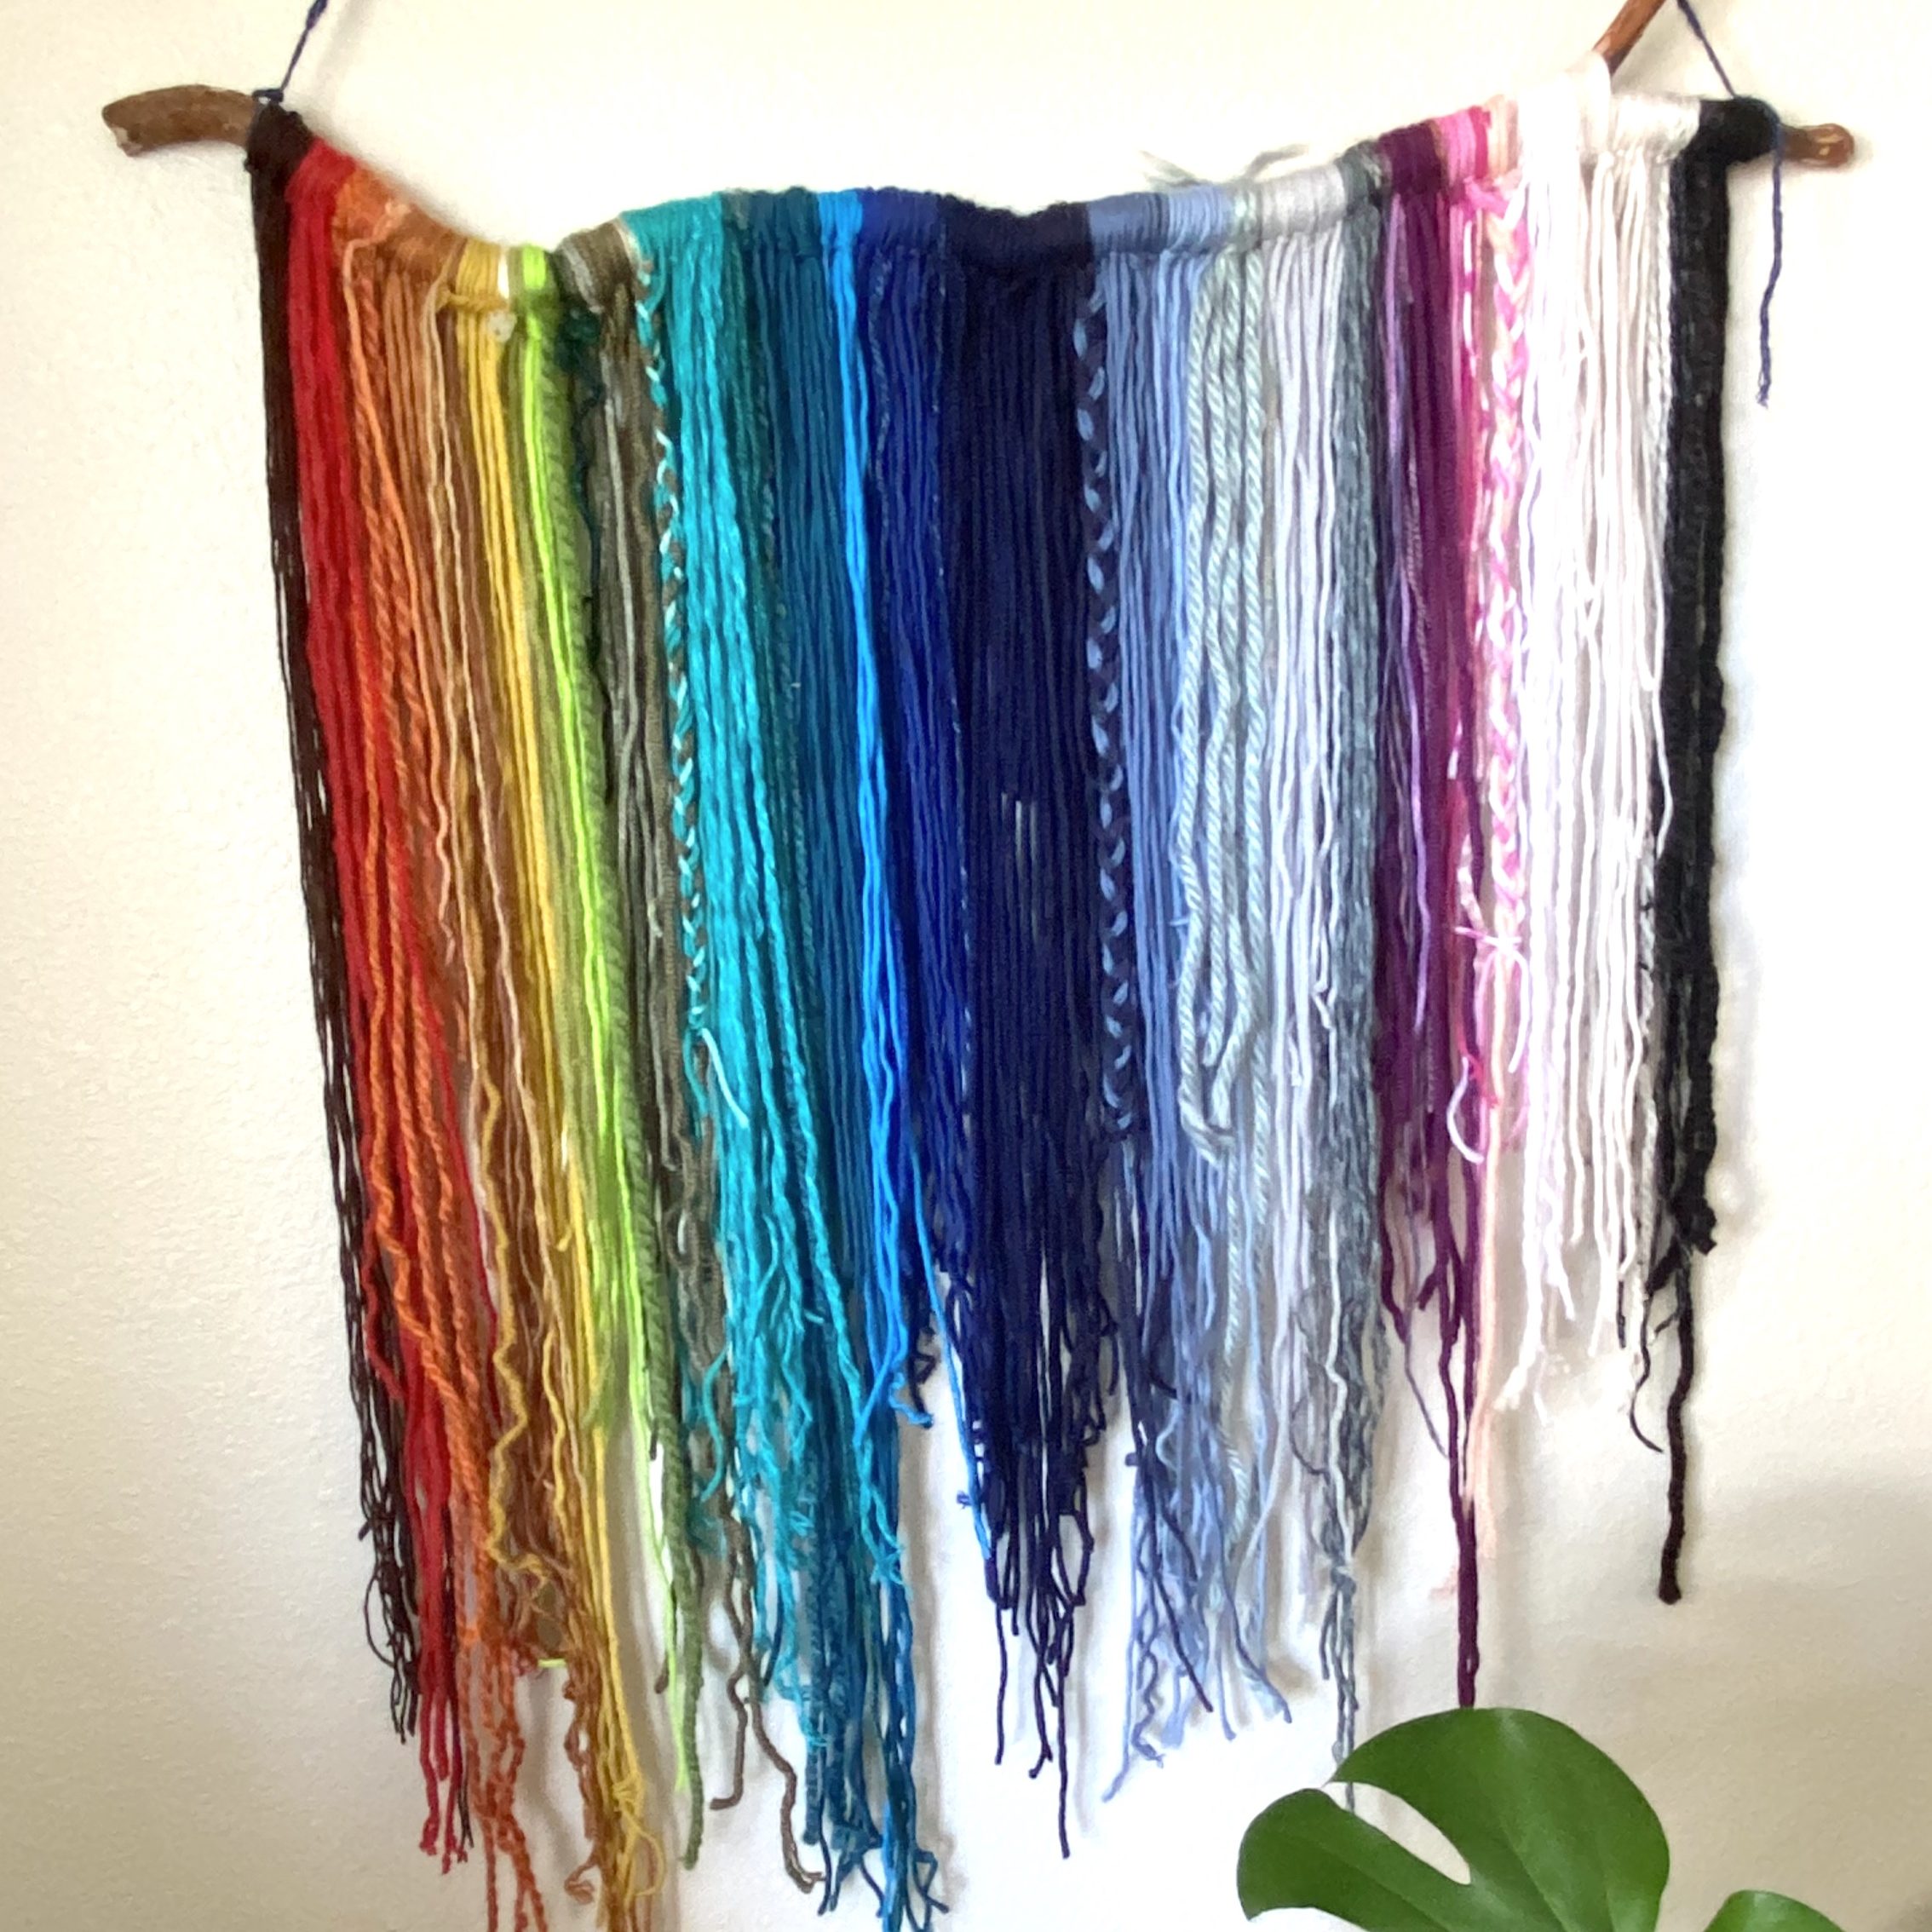
The Stacking Diamonds Blanket was designed specifically to be a scrap yarn blanket. It features a series of color changes that coordinate with two-row repeats. And while you’re doing those color changes, you’re also exploring and practicing some basic crochet stitches to create a geometric diamond texture. This scrappy blanket is edged with an eccentric pom pom border just to give it some finishing flair.
I also graded this blanket pattern for 10 sizes! So whether you have a big stash ready for a scrap yarn blanket or a small one, there’s a size here for you. Along with the usual pattern info, I have also included some video tutorials to help you with stitches and the pom pom border AND a free coloring page to help you plan out your colors.

Love it?! Pin it for Later!

About the Yarn
As I mentioned, this is a scrap yarn blanket, so the yarn used in it was all leftovers from my stash. I like to work with worsted weight yarn, so I have a lot of it leftover from other projects. (Enough to have another project coming later this year even! I’ll keep you posted.) So for this project, I didn’t use any specific brand of yarn, just any yarn that was CYC weight 4 or worsted weight yarn.
If you are shopping for this project, here’s a few of my favorite worsted weight yarns…Mighty Stitch, Brava Worsted, Basic Stitch, Heartland, & Wool-Ease.
How to Determine Yarn Weight
There are two easy ways to determine if your yarn is worsted weight. The easiest method is to check the label. The little yarn skein graphic with a number inside tells you the weight of the yarn. Weight 4 is considered worsted weight yarn and will work for this blanket.

The other (and probably more useful for this project) method for determining the weight works if you don’t have the label. You need to determine the Wraps per Inch (wpi). There are special tools for this, but you can also do it with a ruler or pencil. Simply mark one inch and loosely wrap your yarn around the pencil or ruler until you fill an inch. Worsted weight yarn should be have 9 wpi.


Learn the Stitches
This pattern features several stitches that I think are great for beginners to learn! The smallest stitch used would be a chain but the tallest one is a treble crochet stitch. I recorded a tutorial walking you through some basic crochet stitches, so if you need a quick refresher before you start, check it out!
Tips for Color Changes
Scrap yarn blankets can get a bad wrap for being kinda ugly. It’s not their fault that their a mishmash of random colors. But I think scrap blankets can be beautiful too! So, I’m including some tips on making your odds & ends blanket more aesthetically pleasing and fun.
Arrange your colors first!
I opted to use a gradient color change on my blanket to help the variety of colors blend well. Grouping like colors and deciding on an arrangement before you begin is a great way to bring some order to your random scraps. Some arrangement ideas are gradients, color blocks, repeating stripes. I’ve included a free coloring sheet in this to help you decide what you want to do!
Weigh your yarn!
If you want to ensure that you have enough scrap yarn to finish a two-row repeat without playing yarn chicken, I recommended weighing your yarn with a small kitchen scale before you do a color change. Determine how many ounces you used in each stripe by weighing a skein or cake before and after. (Beginning Weight – Ending Weight = Weight Needed per Repeat) Once you have this number, you’ll be able to weigh any scraps prior to adding them in to see if you have enough. This is a totally optional step, but if you don’t want any mid-row color changes, this is going to be super helpful for you.
You Might Also Like…
Loving the scrappy patterns? You might also like a few of my other free crochet patterns and projects that are perfect for using up your scrap yarn.


Let’s Get Started…
Materials Needed
1,008+ yds of Worsted Weight yarn (see Measurements & Yardage chart below)
Size I (5.5mm) crochet hook
Size H (5.00mm) crochet hook (optional)
Tapestry needle
Scissors
Kitchen Scale (optional)
Stitches Used
Ch – Chain
Sk – Skip
Sc – Single Crochet
Hdc – Half Double Crochet
Dc – Double Crochet
Tr – Treble Crochet
Dc Cluster – Double Crochet Cluster
Sl St – Slip Stitch
Skill Level
Intermediate
Gauge
12 st (1 diamond width) x 8 rows (4 diamond row repeats) = 3.5” square
Pattern for Gauge: Ch 23. Sc in 2nd ch from hook and each ch across. Follow Pattern Rows 2-5.
Measurements & Yardage
| Blanket Size | Measurements (in inches) | Approx Total Yardage | Approx Yardage per Repeat (2 rows) | Foundation Chain | Diamond Repeats (2 rows) |
|---|---|---|---|---|---|
| Stroller | 30×36 | 1008 | 24 | 107 | 42 |
| Toddler | 44×50 | 1856 | 34 | 155 | 58 |
| Crib | 40×60 | 2100 | 30 | 143 | 70 |
| Small Throw | 52×60 | 2520 | 38 | 179 | 70 |
| Large Throw | 60×72 | 3696 | 44 | 203 | 84 |
| Twin | 66×90 | 5164 | 50 | 227 | 105 |
| Full | 80×90 | 6300 | 60 | 275 | 105 |
| Queen | 90×90 | 7140 | 68 | 311 | 105 |
| King | 90×108 | 8568 | 68 | 311 | 126 |
| CA King | 98×110 | 9216 | 72 | 335 | 128 |
Notes
- This blanket was designed as a scrap busting project with the idea that you will change colors after every two-row repeat. It can also be made solid with no color changes for subtle diamond texture.
- This pattern is worked flat in rows. Each set of diamonds consists of a two-row repeat. The stitches are in increments of 12 stitches + 11.
- Stitch counts are noted by the following sizes (Stroller, Toddler, Crib, Small Throw, Large Throw, Twin, Full, Queen, King, CA King).
Special Stitches/Techniques
Treble Crochet: Yarn over twice, then insert hook into stitch. Yarn over and pull up a loop. Yarn over and pull through two loops on hook three times.
Double Crochet Cluster: Yarn over, then insert hook into stitch. Yarn over and pull up a loop. Yarn over and pull through two loops on hook. Yarn over, re-insert hook into same stitch. Yarn over and pull up a loop. Yarn over and pull through two loops on hook. Yarn over and insert hook into stitch a third time. Yarn over and pull up a loop. Yarn over and pull through two loops on hook. Yarn over and pull through all four loops on hook. Chain one to finish the stitch.
Pattern
With trim color, foundation ch according to desired blanket size [see Measurements & Yardage chart]. (107, 155, 143,179, 203, 227, 275, 311, 311, 335)
Row 1: Sc in 2nd ch from hook and each ch across. [Note: Alternatively, you can foundation sc one stitch less than foundation ch] (106, 154, 142, 178, 202, 226, 274, 310, 310, 334)
Row 2: Attach new color. Ch 2 and turn. Begin in same st as turning ch, and work one st in each sc across. Dc 2, hdc, sc, ch 2, sk 2 st. *Sc, hdc, dc 2, tr 2, dc 2, hdc, sc, ch 2, sk 2 st.* Repeat from * to * until 4 st remain. Sc, hdc, dc 2 in last 4 st. (106, 154, 144, 202, 226, 274, 310, 310, 334)
Row 3: Ch 2 and turn. Begin in same st as turning ch, and work one st in each st across. Dc 2, hdc, sc, ch 2, sk 2 st. *Sc, hdc, dc 2, tr 2, dc 2, hdc, sc, ch 2, sk 2 st.* Repeat from * to * until 4 st remain. Sc, hdc, dc 2 in last 4 st. (106, 154, 144, 202, 226, 274, 310, 310, 334)
Row 4: Attach new color. Ch 1 and turn. Begin in same st as turning ch, and work one stitch in each st across. *Sc, hdc, dc 2. Working around the ch-2 from previous two rows, tr 2 in sc sts from 3 rows below. Dc 2, hdc, sc, ch 2, sk 2 st.* Repeat from * to * across. (106, 154, 144, 202, 226, 274, 310, 310, 334)
Row 5: Ch 1 and turn. Begin in same st as turning ch, and work one stitch in each st across. *Sc, hdc, dc 2, tr 2, dc 2, hdc, sc, ch 2, sk 2 st..* Repeat from * to * across. (106, 154, 144, 202, 226, 274, 310, 310, 334)
Repeat Rows 2-5 in sets of two rows (2/3 & 4/5). Each set of two rows will complete one “Diamond Repeat”. Continue for a total of (42, 58, 70, 70, 84, 105, 105, 105, 126, 128) “Diamond Repeats” stopping on the last row of your last repeat. When you are on the last row, of your last “Diamond Repeat” work the pattern as follows:
For Twin, Full, & Queen Size (Odd Number Repeats): Ch 2 and turn. Begin in same st as turning ch, and work one stitch in each st across. Dc 2, hdc, sc. Working around the ch-2 from previous row, sc 2 in tr from 2 rows below. *Sc, hdc, dc 2, tr 2, dc 2, hdc, sc. Working around the ch-2 from previous row, sc 2 in tr from 2 rows below.* Repeat from * to * until 4 stitches remain. Sc, hdc, dc 2. (106, 154, 144, 202, 226, 274, 310, 310, 334)
For All Other Sizes (Even Number Repeats): Ch 1 and turn. Begin in same st as turning ch, and work one stitch in each st across. *Sc, hdc, dc 2, tr 2, dc 2, hdc, sc. Working around the ch-2 from previous row, sc 2 in tr from 2 rows below.* Repeat from * to * across. (106, 154, 144, 202, 226, 274, 310, 310, 334)
Final Trim Row: Attach trim color. Ch 1 and turn. Sc in each st across. If doing Pom Pom Border, leave yarn attached. Otherwise fasten off and weave ends.
Optional Finishing
Pom Pom Border
Continuing with trim color from Final Trim Row and 5.0mm hook. Turn.
Sl st in first st. Ch 6. Dc cluster in 4th ch from hook. Ch 2. Dc cluster in closing ch from previous dc cluster. Fold second dc cluster in half over the first dc cluster. Sl st in same ch sp as first dc cluster to close. Ch 3. Sk 4 st. Sl st in next st.
*Ch 6. Dc cluster in 4th ch from hook. Ch 2. Dc cluster in closing ch from previous dc cluster. Fold second dc cluster in half over the first dc cluster. Sl st in same ch sp as first dc cluster to close. Ch 3. Sk 3 st. Sl st in next st.* Repeat from * to * across. Tie off and weave end.
Attach yarn to opposite edge of blanket and repeat process.
Final Thoughts
I hope you have so much fun making this blanket! Be sure to tag me in your finished makes! I’d love to see what interesting stories your scrap yarn blankets have to tell. You can tag me @craftingforweeks on Facebook or on Instagram. And use the hashtag #stackingdiamondsblanket for a chance to be featured!
Until next time, Happy Crafting!