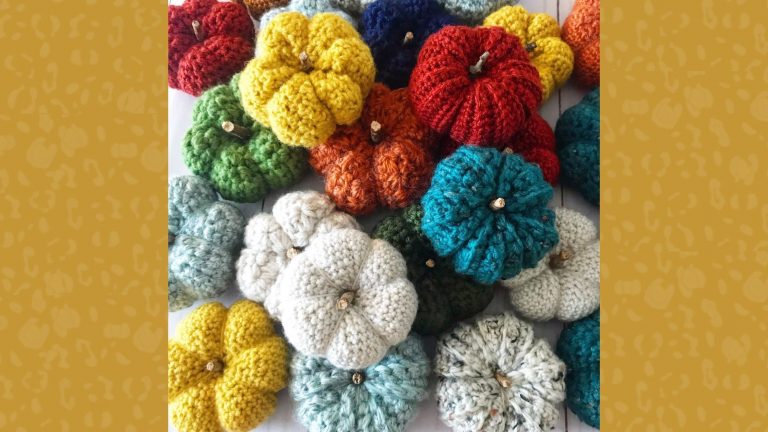

How to Crochet an Easy Scrappy Pumpkin
Every fall I create a new and interesting pumpkin (or squash) pattern to add to my little homemade pumpkin patch. This project combines two of my favorite things: crocheting pumpkins and using up scrap yarn! This easy, scrappy pumpkin is perfect for using little bits of yarn leftover from projects past. And best of all, there’s no weaving ends! I think you’re gonna love this one…

Before you Begin…
You’ll need worsted weight yarn scraps…
And a 5.0mm crochet hook. Here’s my favorite, WeCrochet Dot Hooks!
You can find the ad-free PDF version of this pattern in my Ravelry shop or my Etsy shop. For the free version, keep scrolling!
Be in the know about all the latest and greatest here at Crafting for Weeks by signing up for the newsletter below!
**This site contains affiliate links to products. I may receive a commission for purchases made through these links. This is a great way to support my small business AND get the supplies you need for your project!**
How to Crochet a Pumpkin
While there’s a few different ways to crochet a pumpkin, a common and simple approach is to crochet a rectangle. After completing the rectangle, you simply seam it at the short ends and then cinch the bottom closed with a tapestry needle and piece of yarn. You then stuff the pumpkin with polyfil, and then cinch the top closed in the same manner. Once this is completed, you can add a stem of choice. (Here’s a list I made of fun stem options!)
You can also crochet pumpkins in the round using increases and decreases to create the shape you want. This method tends to be a bit more complex.
About the Pattern
For the scrappy pumpkin, we will use the rectangle method. However, the stem will be made from our unwoven ends! Fun, right? So, you will NOT have to weave any loose ends, AND the more you have, the more interesting your stem will be!
This pattern is written with row counts and yardage for worsted weight yarn and a finished pumpkin that is approximately 6″ wide and 4″ tall (excluding stem height). The size and yarn weight are easily adjustable, and I’ll give you some notes on how to do that as we go.

Love it?! Pin it for Later!

About the Yarn
The scrappy pumpkin is written with worsted weight yarn in mind. I used small amounts of scrap yarn from old projects, but generally speaking, to make the same size as I did, you need about 3.5 yards per stripe. But as I mentioned, this pattern is easily adjustable for other sizes and yarn weights with a measuring tape and a teeny bit of math. But don’t worry, I’ll help you figure that out below!
Yarn Substitute
This pattern can use any yarn weight. To make this adjustment, use a hook that is one size below the size recommended on the yarn packaging. (Ex: label suggests 5.5mm, choose a 5.0mm). Then simply follow the pattern as written. Note that adjusting your yarn weight will alter the size of the finished pumpkin.
Adjusting the Pumpkin Size
This pattern uses a rectangle shape that is seamed and closed to create a pumpkin. The dimensions of this rectangle can be adjusted to create different sized pumpkins while keeping the same proportions for shape. To adjust, do the following:
- Decide the diameter you’d like your pumpkin to have. This is the width measurement across the top. This number will be the width of your rectangle.
- Work your beginning chain until you have reached this desired width, then 2 additional chains.
- Continue the pattern as written with your new stitch count.
- Multiply the desired width by 2.5 to get the length of the rectangle. Continue the pattern repeats until your rectangle reaches this length.
- Finish the pattern as written.

Check out my other Pumpkins!
If you’re enjoying this pattern or just love pumpkins in general, check out some of my other pumpkin patterns. You can see them all in one place by clicking the button below.

Optional Links to Purchase
Don’t forget, you can find the ad-free, printable PDF version of this pattern in my Ravelry shop or my Etsy shop. I love being able to offer my patterns for free, supported by ads. But if you’d rather avoid the ads, I also sell the PDF version of each pattern. You can click the buttons to purchase the PDF in either of my shops or enjoy the free pattern just below!
Let’s Get Started…
Materials Needed
Approx 135 yds of worsted weight yarn scraps (approx 3.5 yds per color or see Yarn Subs)
Size H (5.0mm) crochet hook
Tapestry needle
Polyfil Stuffing
Scissors
Stitches Used
Ch – Chain
Sl St – Slip Stitch
Hdc – Half Double Crochet
Mattress Stitch or Whip Stitch
Skill Level
Beginner
Gauge
Gauge is not essential to this pattern, but to create a similar sized pumpkin, use the following:
16 st x 10 rows = 4” square
Pattern for gauge: Alternating rows of sl st and hdc.
Finished Measurements
6”w x 4”h
Notes
- To form the stem, leave 4-6” tail at the beginning and end of each color change.
- If you are not changing color, you will have a solid color, ribbed pumpkin. Simply finish the pumpkin as written without cutting the tails, then add your own stem.
- Stitch/row count suggestions for alternate pumpkin sizes (worsted weight):
| Pumpkin Size | Foundation Chain | Row Count |
|---|---|---|
| 4″ | 16 | 25 |
| 8″ | 32 | 50 |
| 12″ | 48 | 75 |
Pattern
Using 5.0mm (H) hook. Ch 25.
Row 1: Hdc in 2nd ch from hook and each ch across. Change color in last stitch by finishing the last hdc with next color. Cut previous color leaving a 4-6” tail. (24)
Row 2: Ch 1 and turn. Loosely sl st in each st across. (24)
Row 3: Ch 1 and turn. Hdc in each st across. Change color in last stitch by finishing the last hdc with next color. Cut previous color leaving a 4-6” tail.(24)
Repeat Rows 2 and 3 until piece measures 15 inches or desired length (See Adjusting the Pumpkin Size). For worsted weight yarn, this is approximately 38 rows total. Leave a long tail, approximately 24-36” on the last row.
Assembly
- Fold the work in half so that the short ends meet. Using a tapestry needle and a long tail, sew the two ends together using the mattress stitch or whip stitch. Leave yarn attached.
- Using the tail and tapestry needle, weave the yarn in and out around the bottom edge of the piece approximately every 3-4 rows.

- Cinch the bottom closed and sew around the edge of the cinched circle again to secure it. When it is securely closed, push the tapestry needle down through the center of the piece and pull tail to center. Fasten off.
- Stuff the pumpkin.
- Attach another piece of yarn approximately 24-36” to the last row of your piece along the top. Note: this is the color that your stem will be.
- Using the new yarn and tapestry needle, weave the yarn in and out around the top edge of the piece approximately every 3-4 rows just below the fringe.

- Cinch the top closed and sew around the edge again below the fringe to secure. You should still have a long tail leftover.
- Pull the fringe together at the center of the pumpkin and wrap the long tail tightly around the bunch of tails. Wrap tightly moving upward to create a stem shape. Stop when stem reaches desired size or you have approx 4” of tail left.
- Use the tapestry needle to pull the tail under the wrapped yarn to secure it in place.

- Cut tail, then trim excess fringe to desired length.
Final Thoughts
Thoughts on the pattern. Be sure to tag me in your finished makes! I love to see what you all create from my patterns. You can tag me @craftingforweeks on Facebook or on Instagram. And use the hashtag #scrappypumpkin for a chance to be featured!
Until next time, Happy Crafting!