

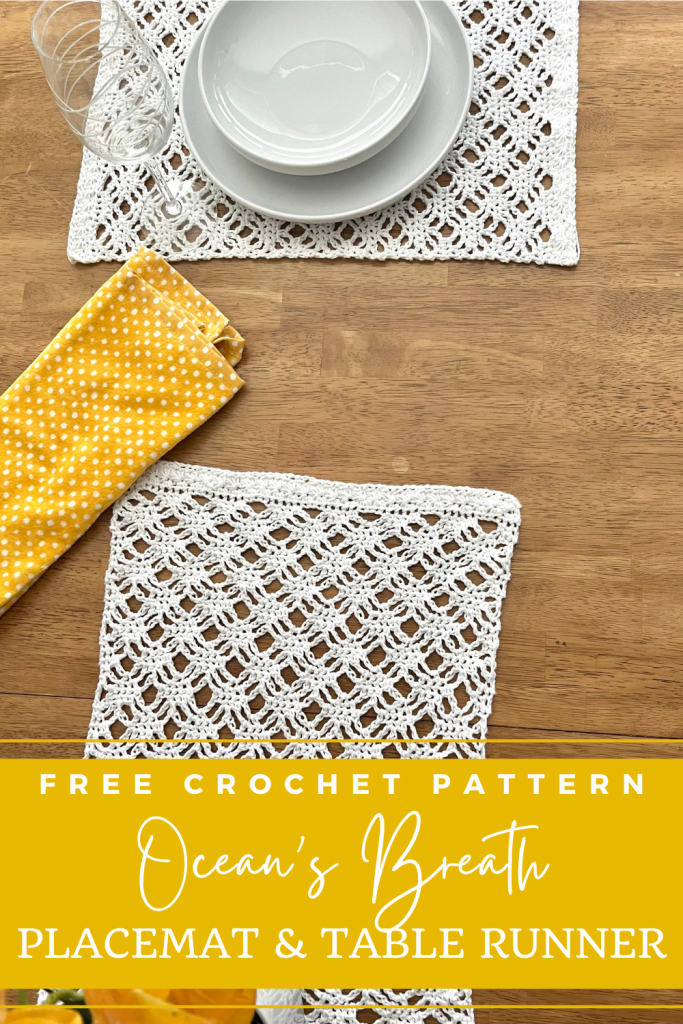
How to Crochet a Boho Placemat & Table Runner
Hey there, friends! So happy to have you here today, and to share a brand new pattern at that! I’m excited to be expanding the Ocean’s Breath Collection with a new table decor set: the Ocean’s Breath Placemats and Table Runner. Like the other pieces of this collection, you’re going to get a little bit of simple lacework, a little bit of star-studded texture, and you’re going to wind up with a fabulous boho piece that looks so much more complex that it is. So let’s get started!

The following is a free pattern available for use on my website, if you would like to purchase a detailed, ad-free PDF version of this pattern, please visit my Etsy or Ravelry shop. All rights reserved.
**This site contains affiliate links to products. I may receive a commission for purchases made through these links. This is a great way to support my small business AND get the supplies you need for your project!**
About the Ocean’s Breath Table Decor
The Ocean’s Breath Table Decor includes a pattern for both the placemat and a matching table runner. Since tableware and tables for that matter, come in all sorts of shapes and sizes, I wrote this pattern to include two different placemat sizes (12″x18″ and 15″x20″). And when it comes to the table runner, I made it to fit my table (15″x64″) but wrote it with notes to help you adjust it to whatever size fits your table. So whether you want to deck out your whole table, or maybe just made a single piece for accessorizing your plants, there’s something there for you.

About the Collection
The Ocean’s Breath Collection started out with the intent to create a crochet piece that looks like macrame and grew from there. The first few pieces of the collection included a yoga mat bag, a fan favorite wall-hanging, and a set of key fobs. From there, I added a short-sleeved cardigan (coming to the blog soon!) and just recently released a brand new market bag. I’m loving all the variations that I can get from this stitch combination and I think once you get started, you’ll fall in love with it too.


About the Yarn
For this project, I used Dishie yarn from WeCrochet. As with most home decor projects, I chose to use cotton yarn for this set. Dishie is such a great cotton yarn to work with. I love the texture of it and the fact that it comes in so many colors! And extra bonus, it’s a really affordable option. If you want to check out Dishie too, just click the button below to head there now.

The Spring Decor Blog Hop
This pattern is part of the Spring Decor Blog Hop hosted by E’Claire Makery and sponsored by WeCrochet. That means that you can purchase the entire bundle of 30 spring decor crochet patterns at a huge discount a part of a special bundle! If you’d like to check out all 30 patterns from this event (and snag them all for just $0.50 a piece!), just click the button below to shop.

Love it?! Pin it for Later!
Customizing your Table Runner
Table runners are generally made to fit a specific table. Since my table is likely a different size and shape than yours, I’m going to give you some tips on how to make your table runner to fit your table.
Customizing the Width
A table runner is generally about 1/3 the width of your table. If you need to increase or decrease the width of the table runner to fit your table, adjust your foundation chain in multiples of 8 stitches. Each multiple of 8 stitches will change the finished width by about 2 inches. This pattern is written for a 15″ wide table runner, so add or subtract 2″ from that for each multiple of 8 that you decide to add on or leave off.
Customizing the Length
The length of a table runner can vary based on personal preference. This means your table runner can hang over each edge of your table (generally 6-12 inches on each end) or it can be short and centered in your table setting. I have a pretty long dining room so to avoid making lace for a million years, I made mine shorter to be centered on the table. (Hint: It’s also a great length for a coffee table!) To adjust the length of this table runner to fit your style preference, continue repeats of the LACE SECTION until your table runner is approx. 1” shy of the finished length. Then you will complete the border. Each repeat will require approx. 17 yds of yarn if you are making a 15” wide table runner.
Let’s Get Started!
Materials Needed
1-3 Skeins of Dishie Cotton (or 165yds+ of Worsted Weight cotton yarn)
Size K (6.5mm) crochet hook
Tapestry needle
Tape Measure
Scissors
Stitches Used
Ch – Chain
SC – Single Crochet
DC – Double Crochet
HDC – Half Double Crochet
Star Stitch (Need help with the Star Stitch, check out this tutorial!)
Skill Level
Intermediate
Finished Measurements
Small: 12”w x 18”l
Large: 15”w x 20”l
Table Runner: 15”w x 64”l
(Note: Measurements may vary slightly based on blocking.)
Yardage
| Project | Yardage Needed | Number of Dishie Skeins Needed |
|---|---|---|
| Small Placemat | 165 | 1 |
| Large Placemat | 205 | 2 |
| Table Runner | 570+ | 3+ |
Gauge
The gauge is not essential to this pattern. However, to meet the measurements listed, use following swatch. Ch 18, sc in 2nd chain from hook and each ch across. Follow LACE SECTION directions. The following swatch should measure 4 1/2” wide and 3” tall.

Notes
- Chains at the beginning of the rows do not count as a stitch throughout this pattern.
- Pattern is written in increments of 8 stitches. If you opt to customize the size of your wall hanging, increase or decrease the starting chain by 8 stitches.
- Some shorthand elements are used in this pattern. 2 Hdc means to work two Half double crochet stitches in the next stitch, while Hdc 2 means to work one Half double crochet stitch in each of the next two stitches.
- When working the LACE SECTION, you will be skipping stitches and using chains to create the open pattern. Only single crochet stitches are counted.
Pattern
With K (6.5mm) Hook
STAR STITCH BORDER
Row 1: Ch (50,58,58). Sc in 2nd ch from hook. Sc in each ch st across. (49,57,58)
Row 2: Ch 3 and turn. Work a row of star stitches (see Special Techniques section for more help). (24,28,28 star stitches)
Row 3: Ch 1 and turn. 2 Hdc in each ch 1 space of the previous row. Hdc in last st. (49,57,57)
LACE SECTION
Row 1: Ch 1. Sc 3. *Ch 5, Sk 3 st, Sc 5.* Repeat from * until 6 sc st remain. Ch 5, Sk 3 st, Sc 3.
Row 2: Ch 1 and turn. Sc 2. *Ch 3, Sk 1 st, Sc 1 in the Ch 5 space, Ch 3, Sk 1 st, Sc 3.* Repeat from * until 3 sc st remain. Sk 1 st, Sc 1 in each of the last 2 stitches.
Row 3: Ch 1 and turn. *Sc 1. Ch 3, Sk 1 st, Sc 1 in the Ch 3 space, Sc 1, Sc 1 in the Ch 3 space, Ch 3, Sk 1 st.* Repeat from * around until 2 sc st remain. Sk 1 st, Sc 1 in the last stitch.
Row 4: Ch 5 and turn. *Sc 1 in the Ch 3 space, Sc 3, Sc 1 in the Ch 3 space, Ch 5, Sk 1 st* Repeat from * until 4 sc st remain. Ch 5. Sc 1 in the Ch 3 space, Sc 3, Sc 1 in the Ch 3 space. Ch 2. Dc in the last st.
Row 5: Ch 1 and turn. Sc 1 in the Dc from previous row. *Ch 3, Sk 1 st, Sc 3, Sk 1 st, Ch 3, Sc 1 in Ch 5 space.* Repeat from * until 5 sc st remain. Ch 3, Sk 1 st, Sc 3, Ch 3. Sk 1 st. Sc in the 3rd ch of the ch 5 from the previous row.
Row 6: Ch 1 and turn. Sc 1, Sc 1 in Ch 3 space. *Ch 3, Sk 1 st, Sc 1, Ch 3, Sk 1 st, Sc 1 in the Ch 3 space, Sc 1, Sc 1 in the Ch 3 space.* Repeat from * until 4 sc st remain. Ch 3, Sk 1 st, Sc 1, Ch 3, Sk 1 st, Sc 1 in the Ch 3 space, Sc 1.
Row 7: Ch 1 and turn. Sc 2, Sc 1 in the Ch 3 space. *Ch 5, Sk 1 st, Sc 1 in the Ch 3 space, Sc 3, Sc 1 in the Ch 3 space.* Repeat from * until 3 sc st remain. Ch 5, Sk 1 st, Sc 1 in the Ch 3 space, Sc 2.
Repeat Rows 1-7 (7,8,29) more times.
STAR STITCH BORDER
Row 1: Ch 1 and turn. Sc 3, *Sc 3 in the Ch 5 space, Sc 5* Repeat from * until 3 sc st remain. Sc in last 3 st. (49,57,58)
Row 2: Ch 3 and turn. Work a row of star stitches (see Special Techniques section for more help). (24,28,28 star stitches)
Row 3: Ch 1 and turn. 2 Hdc in each ch 1 space of the previous row. Hdc in last st. Fasten off and weave in ends. (49,57,58)
FINISHING
Cosmetic Finishes:
- Block your piece to stretch lace and ensure straight edges.
- Optional: Add fringe and/or wood beads to the edges for some extra flair.
To Attach Fringe:
- Cut (49,57,58) strands of yarn approximately 12” long each.
- Fold each strand in half. Insert hook into the first stitch and pull up the center of the strand.
- Using the hook, pull the two ends of the strand from the back and through the loop you just pulled up. Tighten the loop to secure the fringe.
- Repeat in each stitch across
- If adding beads, slide large wood beads onto fringe 2-3 sections at a time and secure with tie or knot.


Final Thoughts
I hope you fall in love with this stitch combo like I have. If you love how this piece turns out, I know you’ll love the rest of the Ocean’s Breath Collection. Be sure to tag me @craftingforweeks on Facebook and Instagram so I can see your finished work! I love to see what you make and I try to share when I can. You can also use the hashtag #oceansbreathtabledecor when you post.
Until next time, Happy Crafting!


I’m having issues downloading this pattern. The link doesn’t take me to the shop for me to download.
Sorry about that! I’ve added the Ravelry link to the post. I’ll include it here too. I haven’t gotten to adding this pattern to Etsy shop yet, but I’ll do that this week.
https://www.ravelry.com/patterns/library/oceans-breath-table-decor