
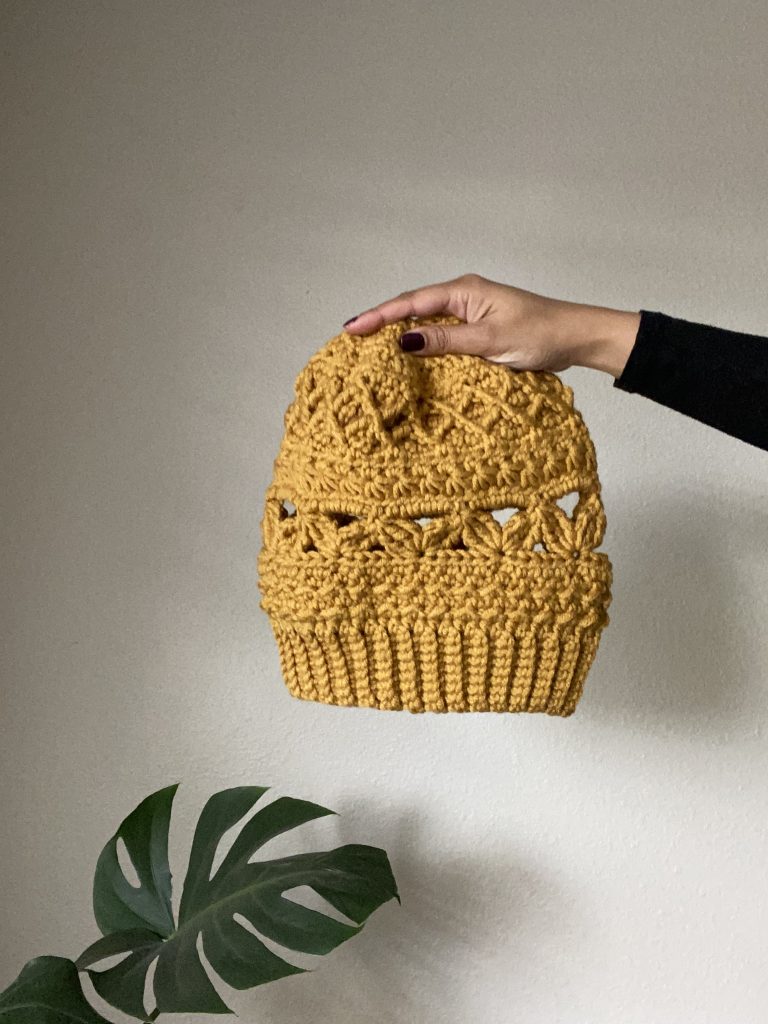
The Pineapple & Pine Beanie: Free Crochet Pattern
I don’t know about you, but I love matching sets! This is part of the reason that my different collections have so many pieces. With the Pineapple & Pine Cowl pattern getting a facelift recently, I decided it’s high time for a matching accessory. So today I present you with the Pineapple & Pine Beanie!
The following is a free pattern available for use on my website, if you would like to purchase a detailed, ad-free PDF version of this pattern, please visit my Etsy or Ravelry shop. All rights reserved.

**This site contains affiliate links to products. I may receive a commission for purchases made through these links. This is a great way to support my small business AND get the supplies you need for your project!**
About the Beanie
This beanie is written in adult size only, just like the cowl. But one fun addition is that you can make it in either worsted weight or bulky yarn! I decided that since my Pineapple & Pine Cowl is done in worsted weight, and Sarah’s Pineapple & Pine Scarf is done in bulky, the beanie needed options.
The Pineapple & Pine Beanie is a slouchy beanie. To get all those fabulous stitches that you know and love from the Pineapple & Pine Cowl is, the hat had to have a bit of slouch to it. The slouchiness of each beanie varies ever so slightly, but the same fabulous style is carried throughout both. If slouchy isn’t your thing, you can take a little bit of the height off of the worsted weight version by reducing the number of star stitches.


About the Yarn
In a perfect world, I would have designed the worsted weight beanie with the Lion Brand Jeans to match the cowl. But I couldn’t find the yarn in my local store, so I went stash diving for something similar that matched gauge. I found that in Lion Brand Heartland! I actually love working with Heartland because the lightly heather color ways are so gorgeous. My testers for this beanie were able to meet gauge with a variety of different worsted weight yarns. I even had a fabulous tester make one in all hand-dyed yarn!
For the bulky weight, I actually did have some Lion Brand Color Made Easy on hand, just like the scarf. So for matching purposes, I designed with that yarn. Bulky yarn can be a little trickier to match gauge with different yarn than worsted. One of my favorite substitutes for Color Made Easy though is Brava Bulky from WeCrochet. I recently made a new sample beanie in Swish Bulky from WeCrochet and its perfection!
About the Stitches
As I mentioned earlier, the Pineapple & Pine Beanie uses the same stitches from the cowl and scarf. When Sarah and I designed these items for a Pineapple & Pine CAL, we each picked a couple stitches that represented our brand.
Sarah’s stitch sections, which we nicknamed Ocean Ripples and Be A Pineapple, both represent her tropical and pineapple-filled brand. My stitch sections, the Mountain and Under the Stars, were representative of my Pacific Northwest home. We combined the inspiration in our designs so that all of the pieces in the collection carry the same stitches throughout.
Since some of these stitches are a little bit tricky for a newbie, but don’t worry! I will give you links to a tutorial and/or video in each section. I’ve found its better to learn as you go with this pattern, so if you’re stuck, check out the little note at the beginning of the section that you’re on for help.
Fall Blog Hop!
The Pineapple & Pine Beanie is being featured in the Fall Blog Hop hosted by Raelynn at Itchin’ for some Stichin’. That means is a free download today only (Sept 13, 2022)! If you haven’t grabbed the coupon code yet, hop on over to Itchin’ for some Stitchin’ for the exclusive code. Then click the button below for your free download!
Hope you enjoy the pattern and be sure to tag me in your makes! And if you’re the mood for a matching set, be sure to check out the Pineapple & Pine Cowl!


Love it?! Pin it for Later!

Let’s Get Started…
Materials Needed
Worsted Weight
1 Skein of Lion Brand Heartland (or 210 yds comparable worsted weight yarn)
Size H (5.0mm) crochet hook
Size I (5.5mm) crochet hook
Measuring Tape
Tapestry needle
Scissors
Optional: Faux Fur or yarn pom (faux fur pom tutorial)
Bulky Weight
1 Skein of Lion Brand Color Made Easy (or 220 yds comparable bulky weight yarn)
Size J (6.0mm) crochet hook
Size K (6.5mm) crochet hook
Measuring Tape
Tapestry needle
Scissors
Optional: Faux Fur or yarn pom (faux fur pom tutorial)
Stitches Used
Sl St – Slip Stitch
Ch – Chain
SC – Single Crochet
HDC – Half Double Crochet
HDC2TOG – Half Double Crochet Two Together
DC – Double Crochet
FPTR – Front Post Treble Crochet
FPTr2Tog – Front Post Treble Crochet Two Together
DTR – Double Treble Crochet
DTR Group – Double Treble Crochet Group
DTRGroup2Tog – Double Treble Crochet Group Two Together
Mattress Stitch
Gauge
Since variety of stitches are used throughout, gauge is based on the most commonly used stitch. Measurements will be provided throughout pattern to check size as you go.
Worsted: (With I hook) HDC 14 st x 12 rows = 4” square
Bulky: (With K hook) HDC 11 st x 8 rows =4” square
Finished Measurements
Worsted: 9.5”w x 10”h
Bulky: 10”w x 10.5”h
Skill Level
Intermediate
Notes
- This pattern is worked flat and then seamed at the end. The recommended seaming technique for this project is the mattress stitch.
- This pattern is written in increments of 12 stitches + 1. If you choose to adjust the stitch count, your total foundation row will need to be a multiple of 12 + 1 stitch.
- This pattern is written in sections of different stitches. Row Count will restart at the beginning of each section.
- Since different stitches are used throughout this pattern, gauge may vary slightly per section. Row measurements are provided for each section to help regulate gauge.
- Pattern is written in sizes (Worsted, Bulky).
Pattern
BRIM
12 rows of Sc in BLO should measure 4” for worsted weight. 11 rows of SC in BLO should measure 4” for bulky weight.
With (5.0mm, 6.0mm) hook, Ch (11,9)
Row 1: Sc in 2nd ch from hook and each ch across. (10,8)
Row 2: Ch 1 and turn. Sc in BLO of each st across. (10,8)
Repeat Row 2 until you have a total of (73,61) rows.
Without breaking yarn, turn brim sideways so that you can begin working along the top edge.
OCEAN RIPPLES SECTION
This section uses a combination of half double crochets and slip stitches to create a subtle rippling texture on both sides of your work. Ocean Ripples Section should measure (1.25”, 1.5”).
Switch to (5.5mm, 6.5mm) hook.
Row 1: Ch 1. Sc in the top of each row across. (73, 61)
Row 2: Ch 1 and turn. Hdc in first stitch. *Sl st in following stitch, hdc in next stitch.* Repeat from * to end of the row. (73, 61)
Row 3: Ch 1 and turn. Sl st in first stitch. *Hdc in following stitch, sl st in next stitch.* Repeat from * to end of the row. (73, 61)
Row 4-5: Repeat Row 2-3

MOUNTAIN SECTION
This section uses a variation of the 3 Strand Zigzag stitch to create the illusion of mountain peaks and valleys. For further help with this stitch, check out this stitch tutorial or this video. Mountain Stitch Section should measure (1.5”, 1.75”).
Row 1: Ch 1 and turn. Sc in first stitch and each stitch across. (73, 61)
Row 2: Ch 5 and turn (counts as first Dtr). Sk 3 st. Work 1 Dtr Group into next stitch. *Ch 5. Work first half of DtrGroup2Tog in same stitch, sk 5 st, finish DtrGroup2Tog in next stitch.* Repeat from * to * until 3 stitches remain. Ch 5. Begin working 1 Dtr Group into same stitch as previous DtrGroup2Tog until last 4 loops remain on hook. Work 1 Dtr in last stitch, yarn over, and pull through 5 loops on hook. [ (11,9) DtrGroup2Tog, 2 Dtr Group, 2 Dtr) ]
Row 3: Ch 1 and turn. Hdc in top of first Dtr Group. *Hdc 5 in the ch 5 space. Hdc in the top of the DtrGroup2Tog* Repeat until you reach the last Dtr Group. Skip Dtr Group and Hdc 1 in the 5 ch of the beginning ch from previous row. (73, 61)

UNDER THE STARS SECTION
This section uses the star stitch. For further help with this stitch, check out this stitch tutorial or this video. Each star stitch row measures (0.75”, 1”) NOTE: Be careful to keep your tension loose with this section as the star stitch will tend to work up tighter than the surrounding stitches.
Row 1: Complete a row of star stitches doing the following:
Ch 3. Insert hook in 2nd ch from hook, pull up a loop. Then insert hook into next ch, pull up a loop. Insert hook and pull up a loop over next 3 st. (6 loops on hook) Yarn over and pull through all loops on hook. Ch 1 to close star stitch (eye of star stitch).
*Insert hook into eye of star stitch, pull up a loop. Then insert hook between the last two spikes of the previous star stitch, pull up a loop. Insert hook in the same stitch as the last spike of the previous star stitch, pull up a loop. Insert hook and pull up a loop over next 2 stitches. (6 loops on hook) Yarn over and pull through all loops on hook. Ch 1 to close star stitch.*
Repeat from * across until you finish the last star stitch. Hdc in last stitch (same stitch as last star stitch). [ (36,30) star stitches)
Row 2: Ch 1 and turn. Sk hdc from previous row. 2 Hdc in the eye of each star from the previous row. Repeat in each eye across. Hdc in the top of last star stitch. (73, 61)
For Worsted Weight pattern only, complete Rows 3-4. Bulky Weight pattern, move onto Be A Pineapple Section. (For a less slouchy worsted weight hat, skip the second row of star stitches.)
Row 3-4: Repeat Rows 1-2

BE A PINEAPPLE SECTION
This section uses the Diamond Trellis stitch to mimic the texture of a pineapple. For further help with this stitch, check out this video. Each set of Dc/Tr rows should measure (0.75”, 1”).
Row 1: Ch 1 and turn. Sc in first stitch and each stitch across. (73, 61)
Row 2: Ch 2 and turn. Dc in first stitch and each stitch across. (73, 61)
Row 3: Ch 1 and turn. FPTr around 2nd sc from Row 1. On current row, sk 1 st, sc 3. *Begin FPTr2Tog around same stitch as previous FPTr, sk 3 sc from Row 1, finish FPTr2Tog around next sc from Row 1. On current row, sk 1 st, sc 3.* Repeat from * to * until 1 stitch remains. FPTr around same stitch as the previous FPTr2Tog until last 2 loops remain on hook, sc in last stitch and pull through all 3 loops on hook.
Row 4: Ch 2 and turn. Dc in first stitch and each stitch across. (73, 61)
Row 5: Ch 1 and turn. Sc 2. *Begin FPTr2Tog around top of same FPTr from previous cable row; finish FPTr2Tog around next FPTr from previous cable row. On current row, sk 1 st, sc 3.* Repeat from * to * across. Sc in last two stitches.
DECREASING ROWS
The decreasing rows will help to shape the top of the hat and allow the previous section to be fully visible when you close the top of the hat.
Row 1: Ch 1 and turn. *Hdc2tog in first stitch, hdc 4.* Repeat from * to * across. Hdc in any remaining stitches.
Row 2-3: Repeat Row 1
For Worsted Weight pattern only, complete Row 4. For Bulky Weight, move onto Row 5.
Row 4: Repeat Row 1
Row 5: Ch 1 and turn. *Hdc2tog in first stitch, hdc 2.* Repeat from * to * across. Hdc in any remaining stitches.
For Worsted Weight pattern only, complete Row 6. For Bulky Weight, move onto Row 7.
Row 6: Repeat Row 5
Row 7: Ch 1 and turn. *Hdc2tog in first stitch, hdc.* Repeat from * to * across. Hdc in any remaining stitches.
Tie off leaving long tail for seaming hat.
FINISHING
- Using a tapestry needle, weave your long tail in and out every 2-3 stitches along the last row.
- Fold the beanie in half and cinch the top closed. Secure the top by bringing the tail back through the first stitch in the last row.
- Line up the sections of the beanie. Stitch the two ends together using the mattress stitch.
- Tie off and weave ends.
- Optional: Attach a pom to the top of the hat. For a tutorial on making your own faux fur poms, head to this post.

Final Thoughts
I hope you enjoy making this hat! This is such a fun project for me because I like keeping things interested with new stitches every few rows. I’d love to see your beanie projects, so be sure to tag me on Instagram at @craftingforweeks on Facebook or Instagram so I can see and share!
And check out the Pineapple & Pine Earwarmer from A Plush Pineapple. Her coordinating accessory in this series is available for free on her blog!
Until next time, Happy Crafting!